Inventory analysis
Inventory Analysis (IA) is a powerful planning tool that answers the question: "Do I have enough parts to build this?"
It allows you to simulate building one or more instances of your products—whether they are new hypothetical builds or existing physical instances you are working on - and checks your inventory levels to determine exactly what parts are missing.
It can then generate Purchase Orders (POs) for those missing items (and optionally associate them with a Deliverable for tracking costs).
Inventory Analysis is always a two-step process:
- Select instances
- View inventory needs
1. Select instances
The first step is to define your Instance Set. This is the collection of things you want to build.
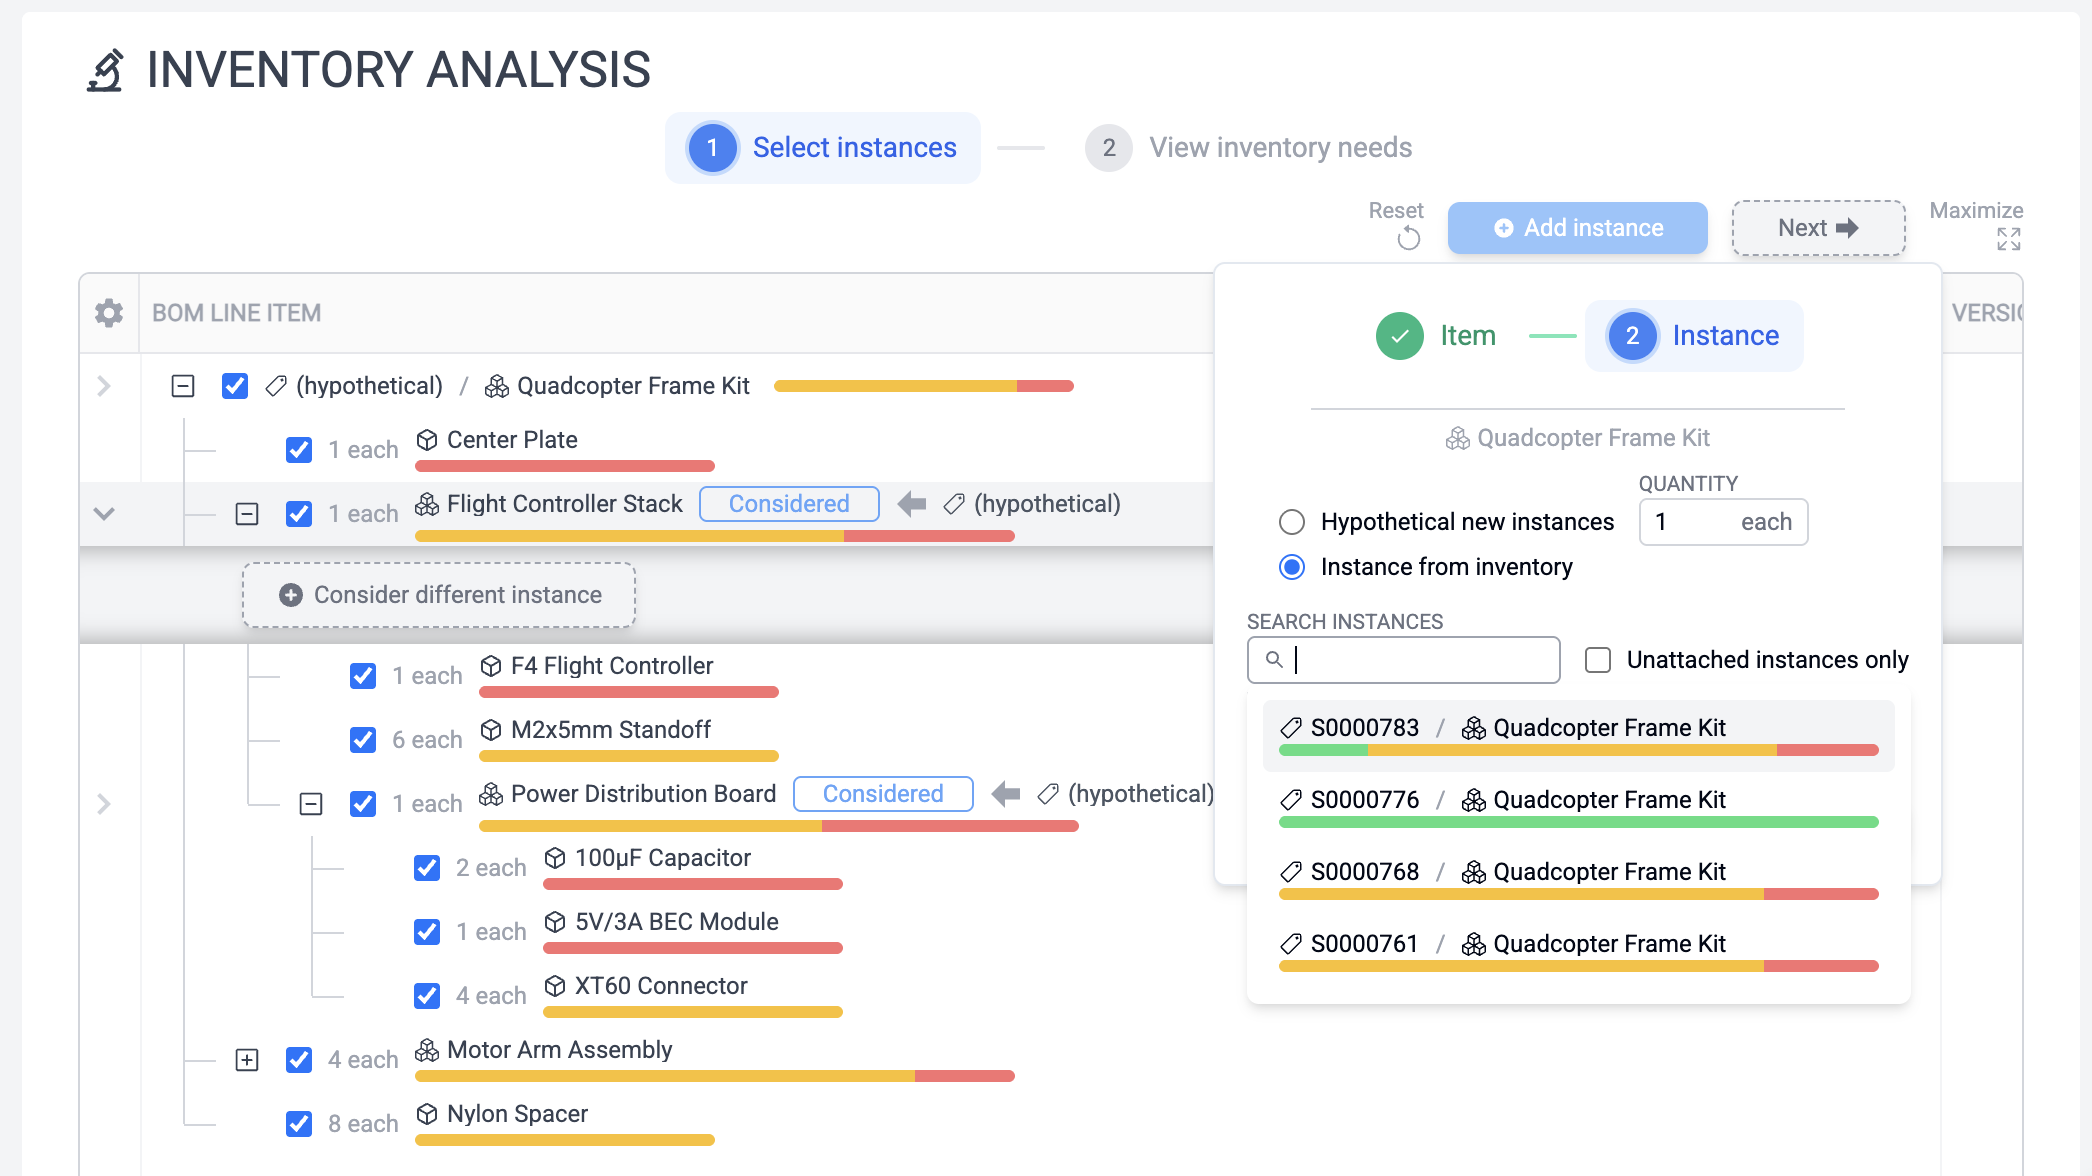
Click Add instance to open the selection dialog. You have two options for the source of the instance:
Hypothetical new instances
Use this when you are planning a new build.
- Item: Select the product you want to build.
- Quantity: How many do you want to build?
- Source: Choose "Hypothetical".
The system will treat this as a "virtual" instance that requires 100% of its parts. Hypothetical instances help run scenarios like "what would we need to buy if an order showed up for 10 of our [complicated product assembly]"?
Instance from inventory
Use this when you have a real, partially-built instance in your inventory and you want to finish it.
- Item: Select the type of item.
- Instance: Search for the specific serial number of the unit you are building.
The system will inspect the actual state of that instance. If you've already installed the motors, it won't tell you to buy them again. It only looks for the parts that are not yet installed or reserved.
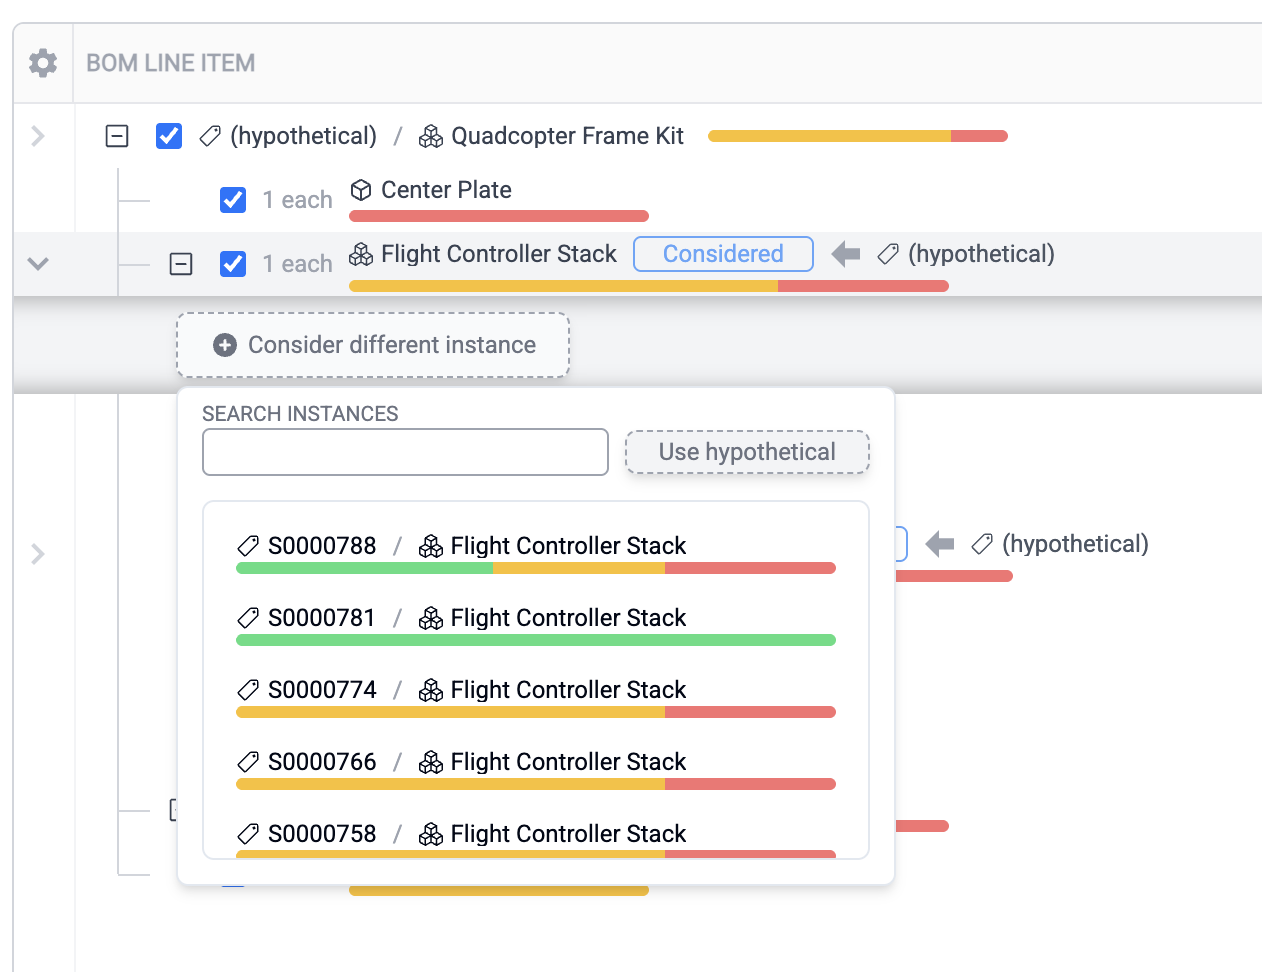
Swapping instances
You can also swap in existing sub-assemblies from inventory at arbitrary locations in the instance set hierarchy, even for hypothetical instances. If you want to price out a hypothetical new quadcopter drone from the tutorial, but you already have a spare Flight Controller Stack you want to use in inventory, you can swap it in. Just click on the Flight Controller Stack row in the instance set to expand its detail view, then choose "Consider different instance".
The Analysis View
Once you add instances, they appear in the table. You can expand them to see their entire Bill of Materials hierarchy.
The bar graphs indicate the inventory status for each part line item in the assembly, summed and propagated recursively throughout the entire subassembly:
- Installed (Green): Part is already physically installed on the instance.
- Reserved (Blue): Part is in stock and already reserved on the instance.
- Available (Amber): Part is available in inventory.
- Missing (Red): Not enough stock. You'll need to buy this.
Tip
Smart Allocation The tool is smart about allocation. If you are building 10 quadcopter drones and you have 4 motors in stock, it will show 4 as "Available" (Amber) and 36 as "Missing" (Red). It allocates your existing stock to fill the needs of the analysis set first.
You can remove instances from consideration in the analysis using the checkboxes, or clear the entire set with the Reset button in the toolbar.
2. View inventory needs
Once you are satisfied with your set of instances, click Next (or the View inventory needs tab at the top).
This view calculates the total shortage across all instances in your set and groups the missing items by Vendor.
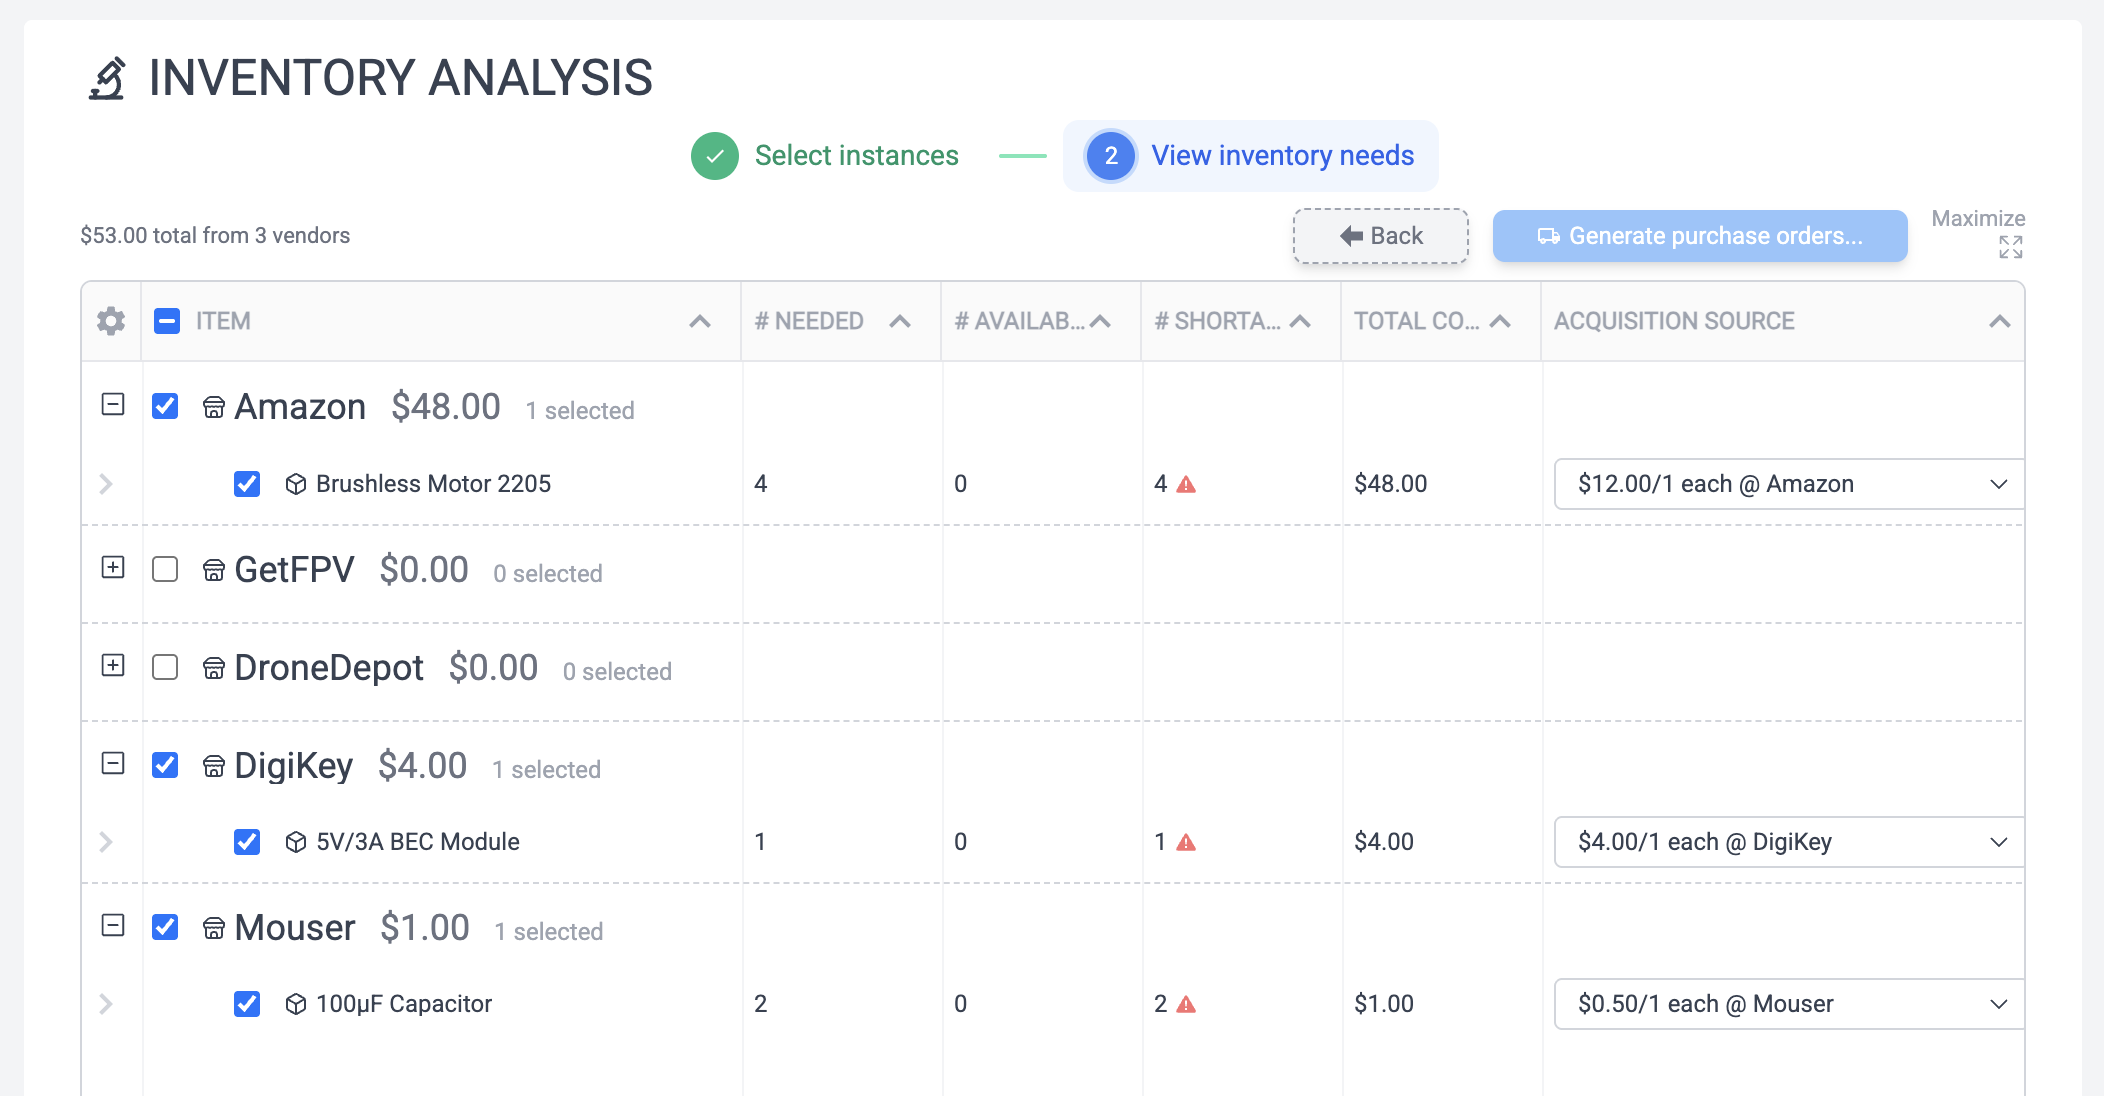
- Vendors: The list is organized by the preferred vendor for each item.
- Vendor selection: If an item can be bought from multiple vendors, you can use the dropdown to swap vendors. This allows you to consolidate orders (e.g., buying common screws from Amazon instead of McMaster-Carr to save on shipping).
- Selection: Uncheck specific rows if you do not want to generate a PO for them right now.
Generating Purchase Orders
When you are ready, click the Generate purchase orders... button.
- Review: The dialog will confirm how many POs will be created (one per selected vendor).
- Deliverable: You can optionally link these new POs to a Deliverable. This is useful if you are buying parts specifically to fulfill a customer order; the POs will be associated with that Deliverable for easier tracking.
- Generate: Click Generate to create the records.
You will be redirected to the Purchases page, where you can view, approve, and send out your new purchase orders.
Tip
This process is non-destructive. Generating POs does not consume your inventory or modify the instances. It simply creates the purchase records. You can run the analysis as many times as you like.