Tutorial
Getting Started
If you haven't yet, create an account to follow along with this tutorial. It's free and only requires one click.
Don't worry about making a mess with this tutorial or any other experiments—you can always create new workspaces with organizations to start fresh.
Quadcopter example
Let's say we're building the quadcopter drone below. We see it has a hierarchical BOM, where sub-assemblies may have sub-assemblies (like the flight controller's power distributing board). Each row is a line item in its parent BOM.
Quadcopter Frame Kit (built in-house)
├─ 4× Motor Arm Assembly (built in-house)
│   ├─ 1× Carbon Fiber Arm (DroneDepot, $8)
│   ├─ 1× Brushless Motor 2205 (Amazon, $12)
│   └─ 4× M3x10mm Screw (McMaster-Carr, 100 for $5)
├─ 1× Flight Controller Stack (built in-house)
│   ├─ 1× F4 Flight Controller (GetFPV, $35)
│   ├─ 1× Power Distribution Board (built in-house)
│   │   ├─ 1× 5V/3A BEC Module (DigiKey, $4)
│   │   ├─ 4× XT60 Connector (Amazon, 10 for $8)
│   │   └─ 2× 100µF Capacitor (Mouser, $0.50)
│   └─ 6× M2x5mm Standoff (McMaster-Carr, 50 for $6)
├─ 1× Center Plate (DroneDepot, $15)
└─ 8× Nylon Spacer (Amazon, 100 for $4)
We begin by defining each item, 14 total. All items that define BOMs will be built in-house. Note we've also gathered notes on prices and vendors for the purchased items, which can be used by inventory analysis to generate and suggest purchases to mitigate shortages.
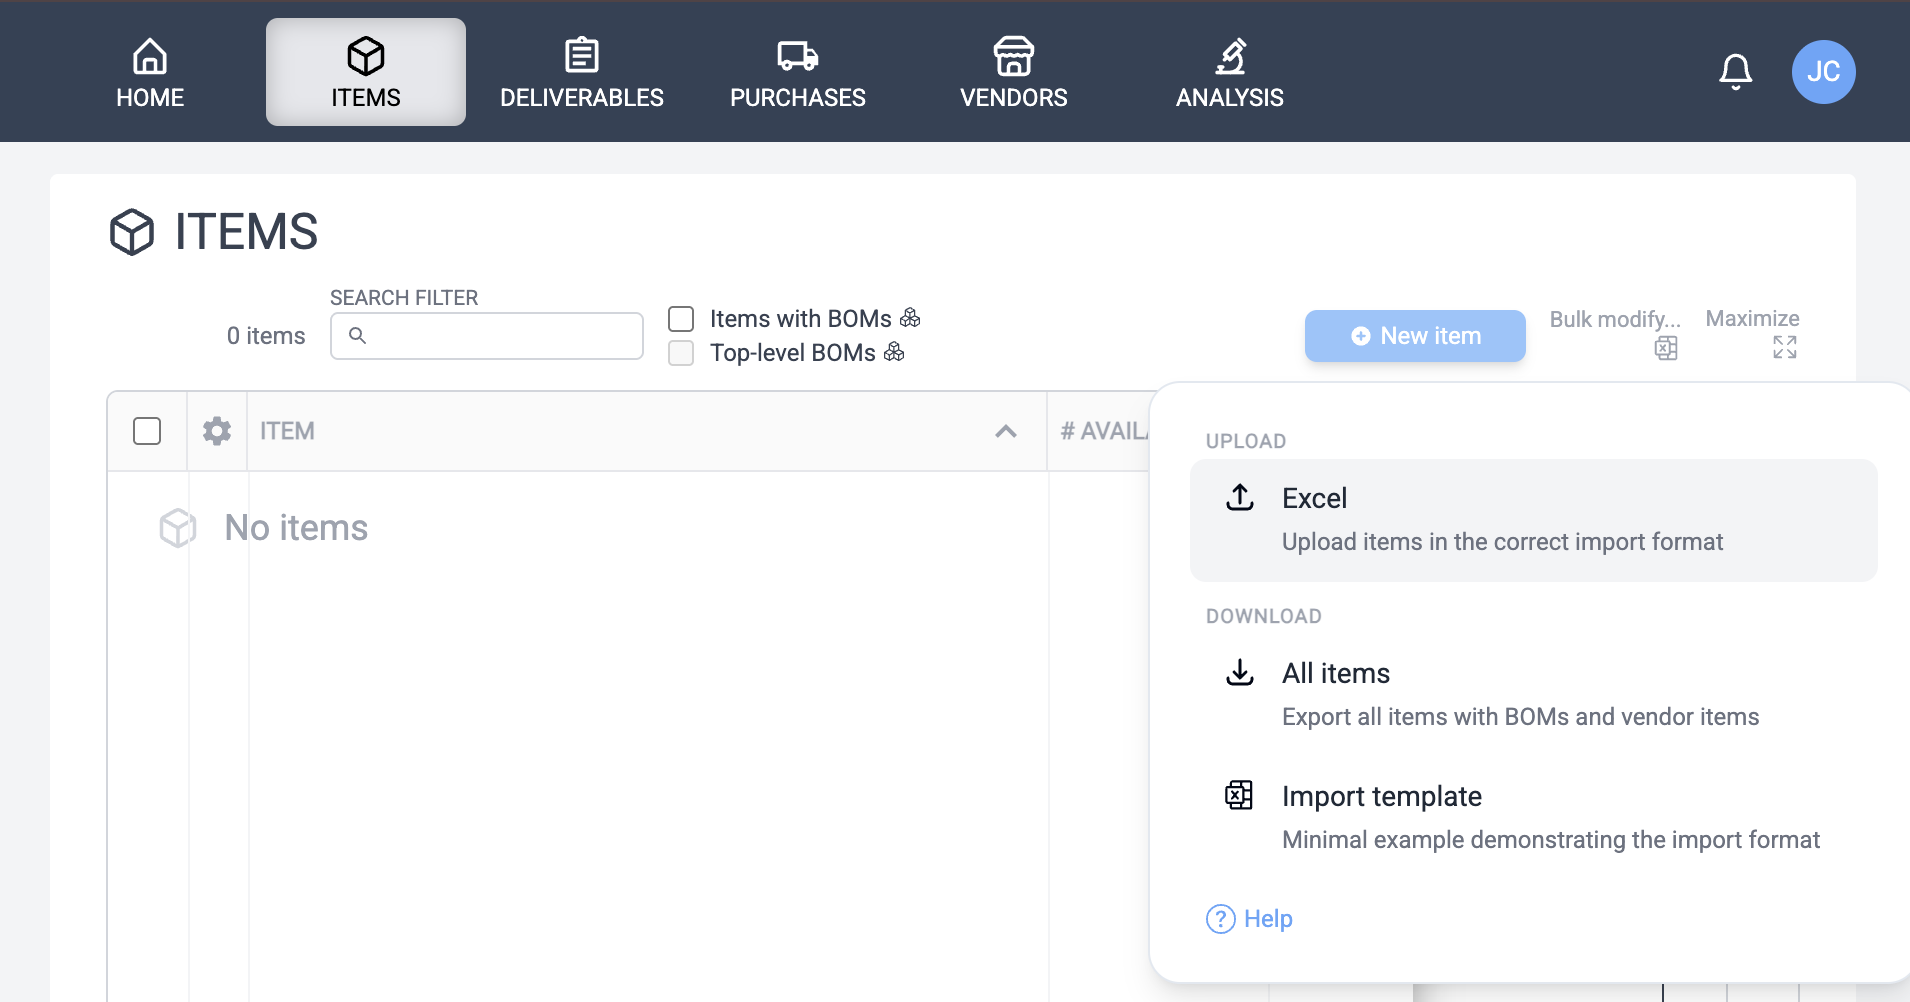
You can generate these items through the UI with the "New Item" button in the items list (then add item references on the item's BOM tab), or if you have a large BOM, you can use bulk import from Excel. We'll use bulk import for the BOM above. The completed import template can be downloaded here. The bulk import location is shown in the screenshot below.
Once imported, you should be able to see the hierarchy in the items view by expanding the plus sign icons.
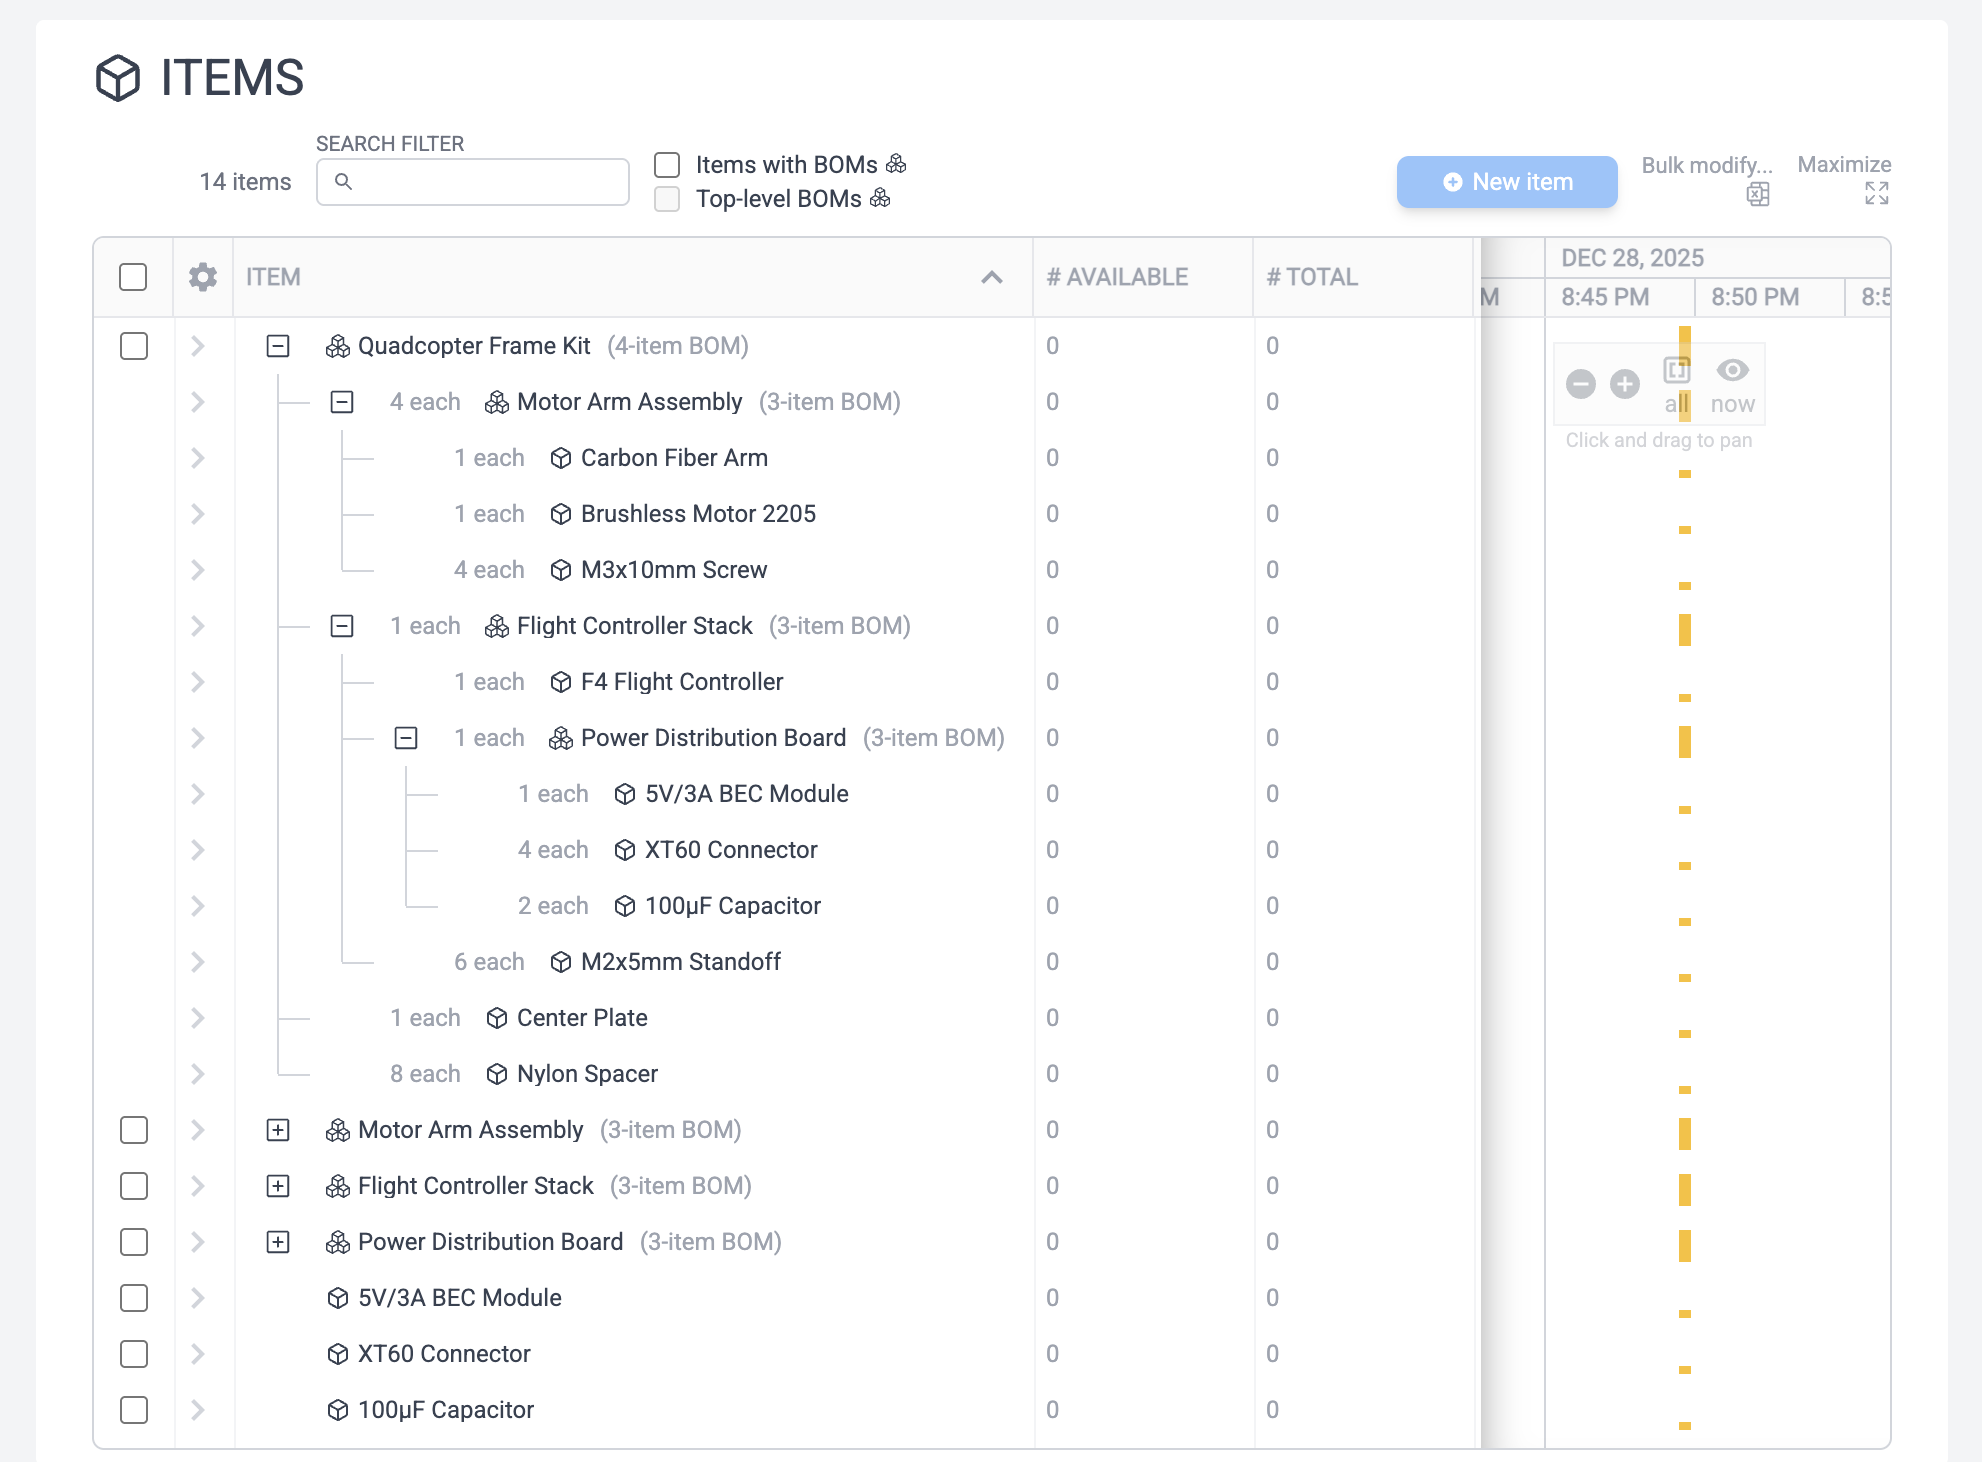
Gantt histogram
Note the table is divided into two halves, a left and right side. The right side is the "Gantt histogram" section, where you can see activity ("events") of that row with their relative frequency roughly denoted by amber bar height. Since we just created a bunch of items at once, we see activity on each item for the current time.
Clicking on a row (the background of the row, not e.g. the links in the text) expands the event detail section, showing exactly what events are responsible for those histogram entries.
Thus, for any table with the Gantt histogram, you can see at a glance the degree of activity going on with each item, instance, vendor, etc. This becomes a powerful visualization. These tables are sorted by last event date by default, which means you'll always be looking at the most recent activity.
Tip
You can change the timescale of the Gantt histogram view with the plus and minus icons at the top. "Now" skips to the current item and "all" zooms out such that all events are visible.
Item editor
Click on the Quadcopter Frame Kit. This will bring up the item editor. Make sure the inventory tab is selected, showing serialized and unserialized. For items with a BOM, you typically will want to create serialized instances, which also instantiates the BOM's line items to show their attachment status on the instance.
Click the New Instance button. The "Create & reserve child BOMs" option was checked, which means new serialized instances were also created for all sub-assemblies throughout the BOM, recursively, attached with a "Reserved" state. You can see this by expanding the plus signs to show the BOM hierarchy on the instance and noting where the Reserved badge points to a serial number having been assigned.
Tip
Table columns can be resized to see more such info such as e.g. the serial number of instances attached to a line item. The columns can also be reordered with the gear icon at top-left.
Instance editor
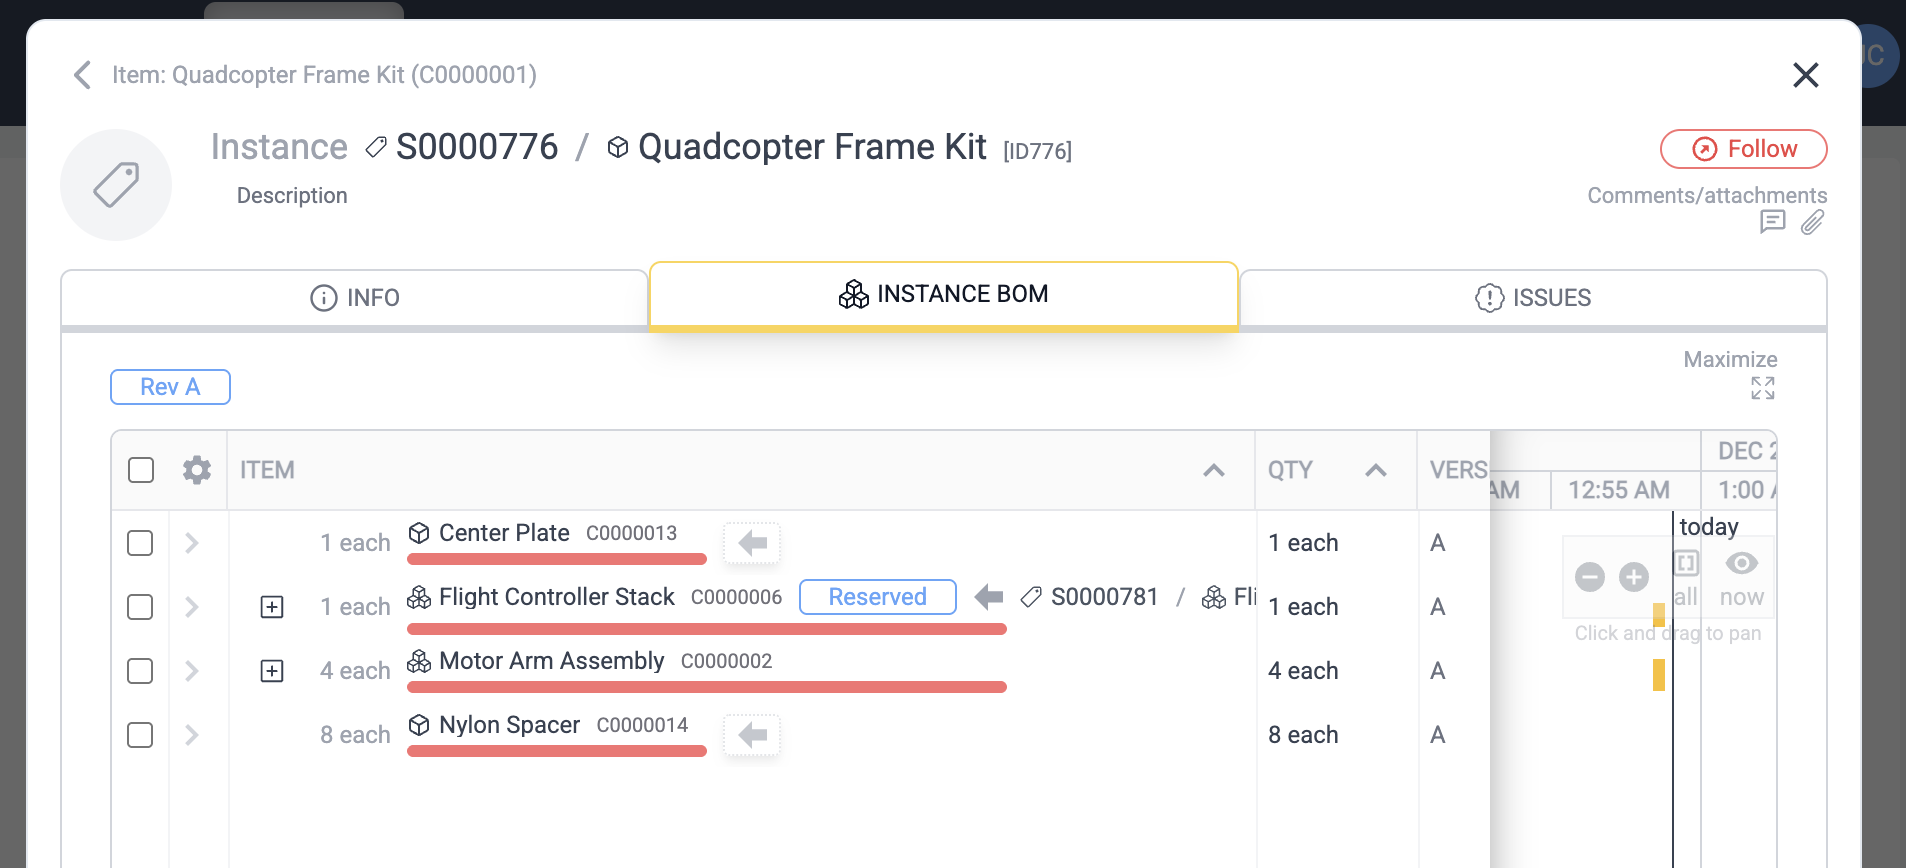
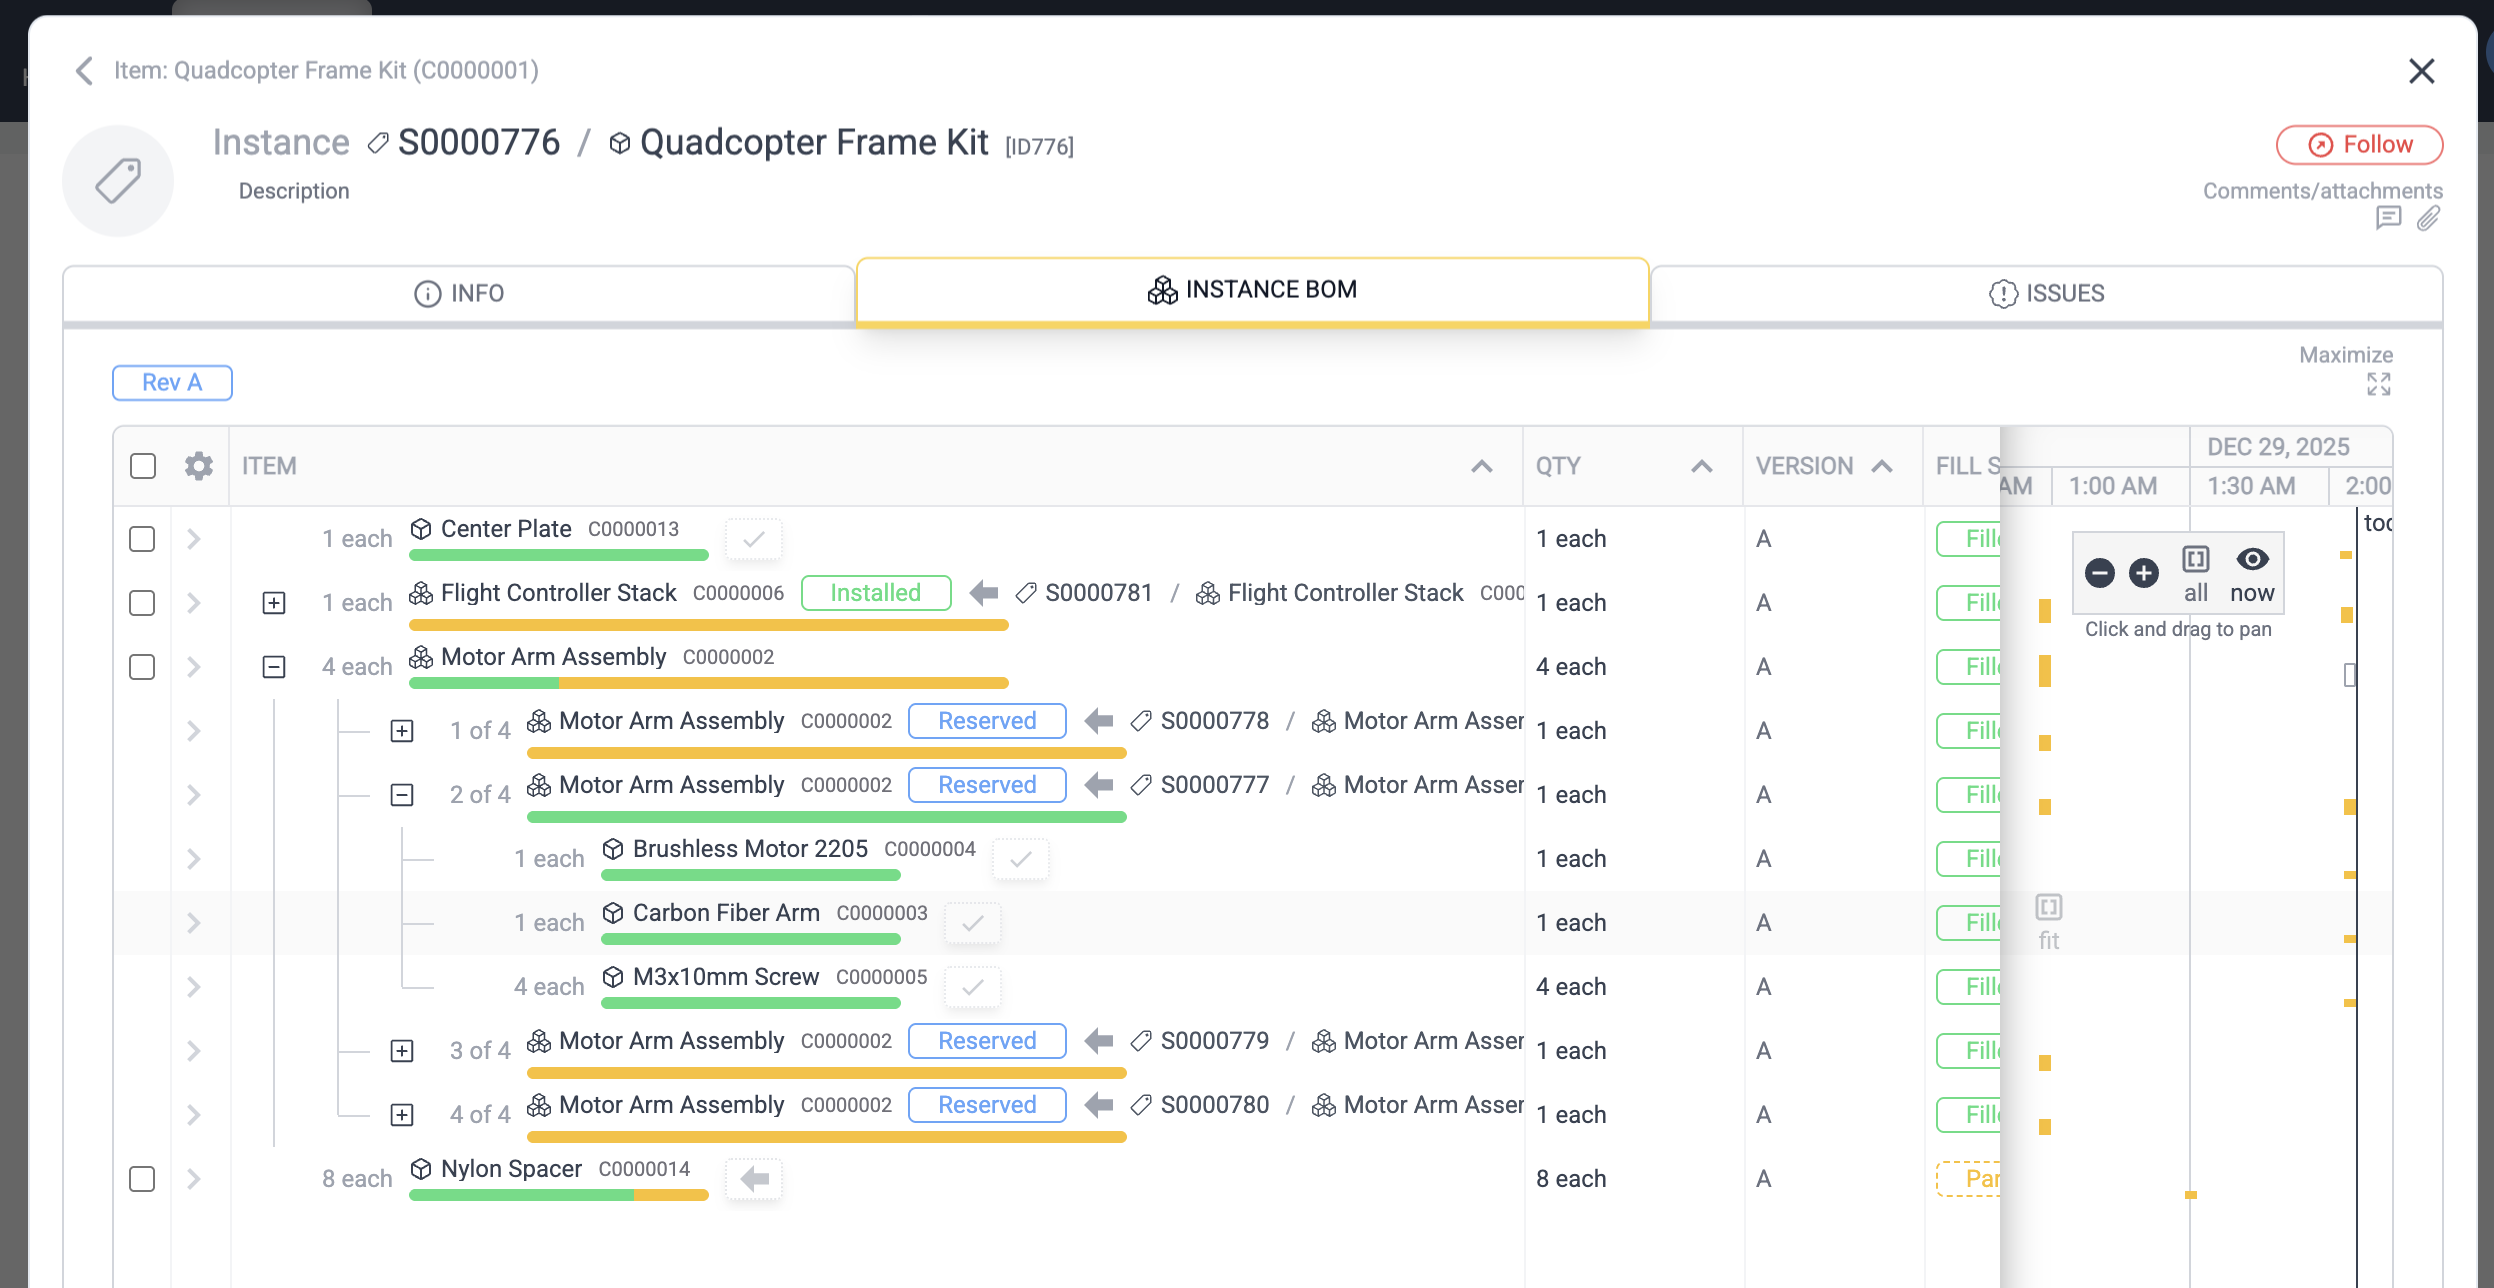
When we create the instance, it automatically takes us into the instance detail editor, with the instance BOM tab. This is a particular instantiation of the item and each line item contains a history of the items that have been attached to it.
Click on the row for the Nylon Spacer (8 each). This is a similar event detail viewer like we saw with the item list, except here we see an "Attach" button rather than the events. This is because for this instance, the events in question are "attach events", where items are attached. If we click "Show history" we see the usual full event list, including "inactive" attach events (those that no longer contribute to reserve or install inventory).
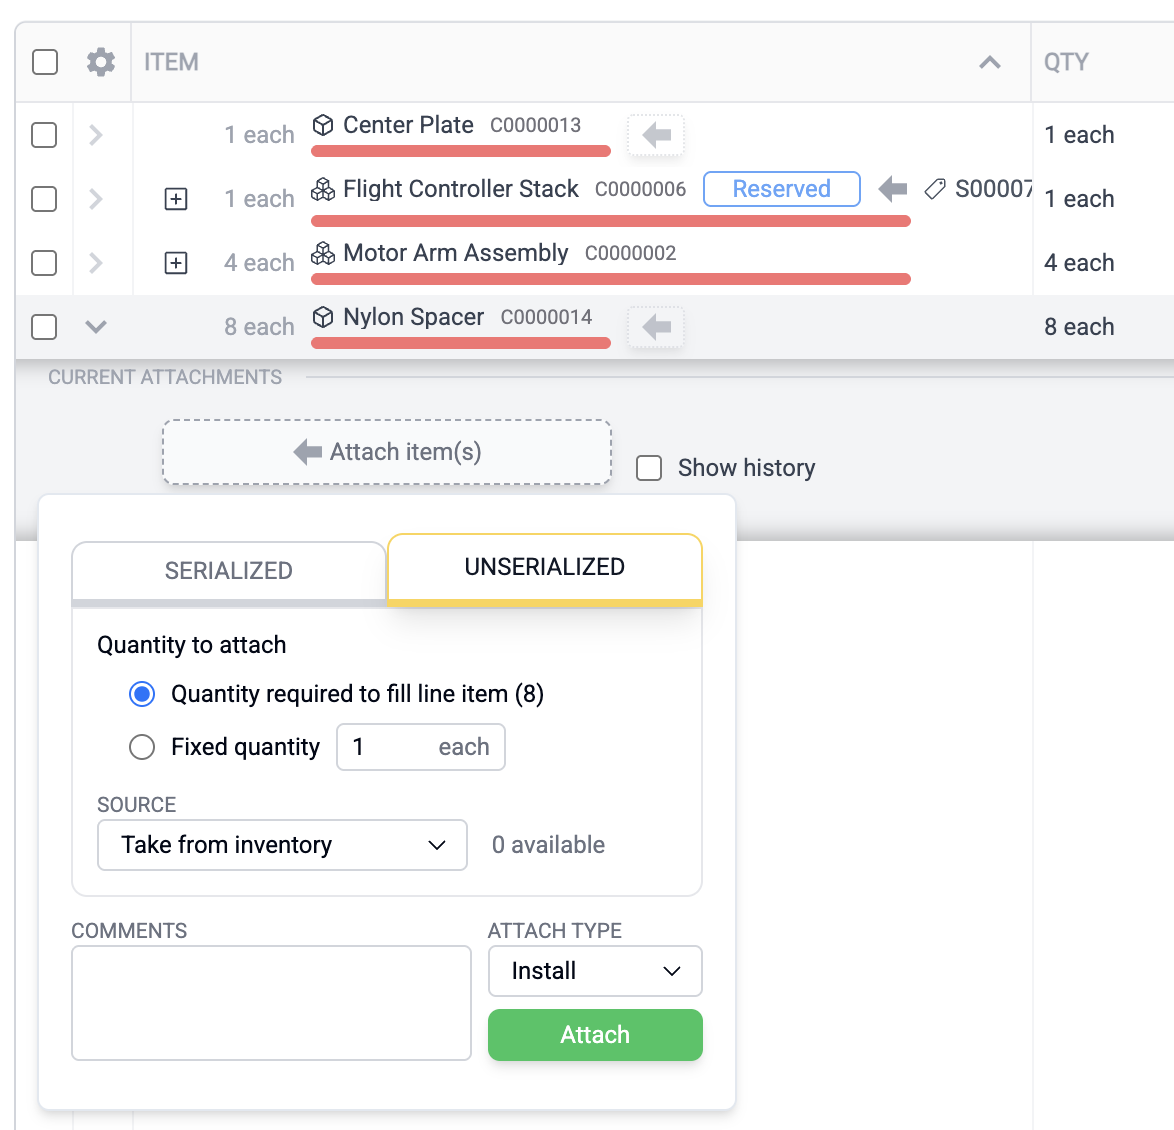
Clicking the Attach item button brings up the attach event popover. Here you can attach both serialized and unserialized inventory, either reserving the inventory or marking it as installed. This is how you "build the item virtually" while building it in parallel in real life. It's the build technician who does this step.
Note also the red bars on each line item. These denote the status of items on that line item. Status can be reserved, installed, unavailable, and available. Note also that there are two different widths. That's because the Flight Controller Stack and Motor Arm Assembly are instances of BOMs, which are themselves basically a wrapper around a set of items. Nylon Spacer and Center Plate, on the other hand, are actual items.
Another point to mention: Motor Arm Assembly uses quantity 4 each. If you expand the hierarchy, you see each individual "slot" that needs to be filled by a serialized instance of that BOM ("1 of 4", "2 of 4", etc). If you created the new instance with "Create & reserve child BOMs" checked, you'll see instances attached on each of these slots, reserved, which can be expanded. There you'll see the thinner red bar denoting the real item, rather than a BOM instance collection of items.
Now, they're red because all inventory is unavailable currently. We have not provided any. Let's add some. Click on the Nylon Spacer item, bringing up the item editor centered on the inventory tab. It shows 0 unserialized and 0 serialized. Unlike with the complex Quadcopter Frame Kit where we created a new instance, for simple nylon spacers these do not need to be serialized. We'll instead add 6 unserialized inventory with the Add/Remove button.
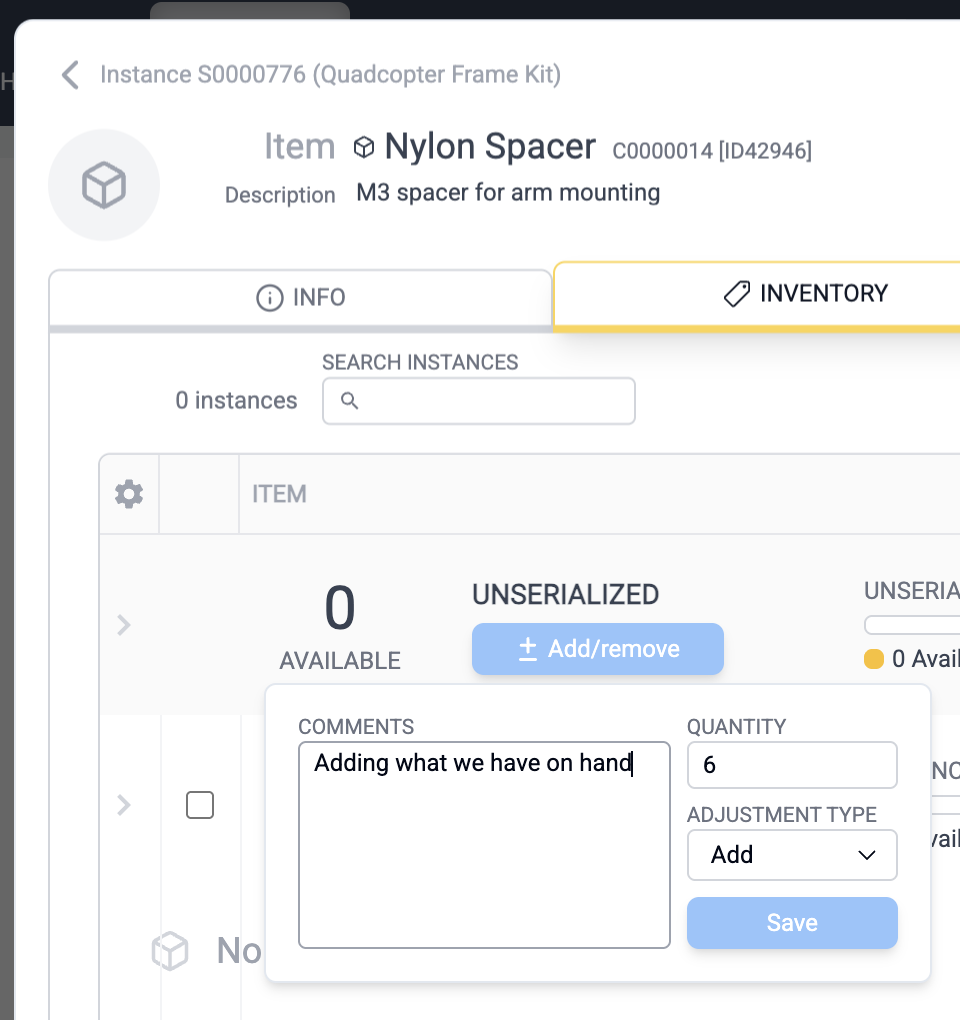
Now if we click the back button to return to the instance editor, we see the Nylon Spacer bar graph is 6 parts amber and 2 parts red. This is because we now have 6-quantity spacers but 8 are called for. Let's attach the six we have. We could expand the detail view and click the Attach button, or click the faint arrow button next to the title as a shortcut. We'll attach the six we just added to this instance, which will change the color to green and red as shown below.
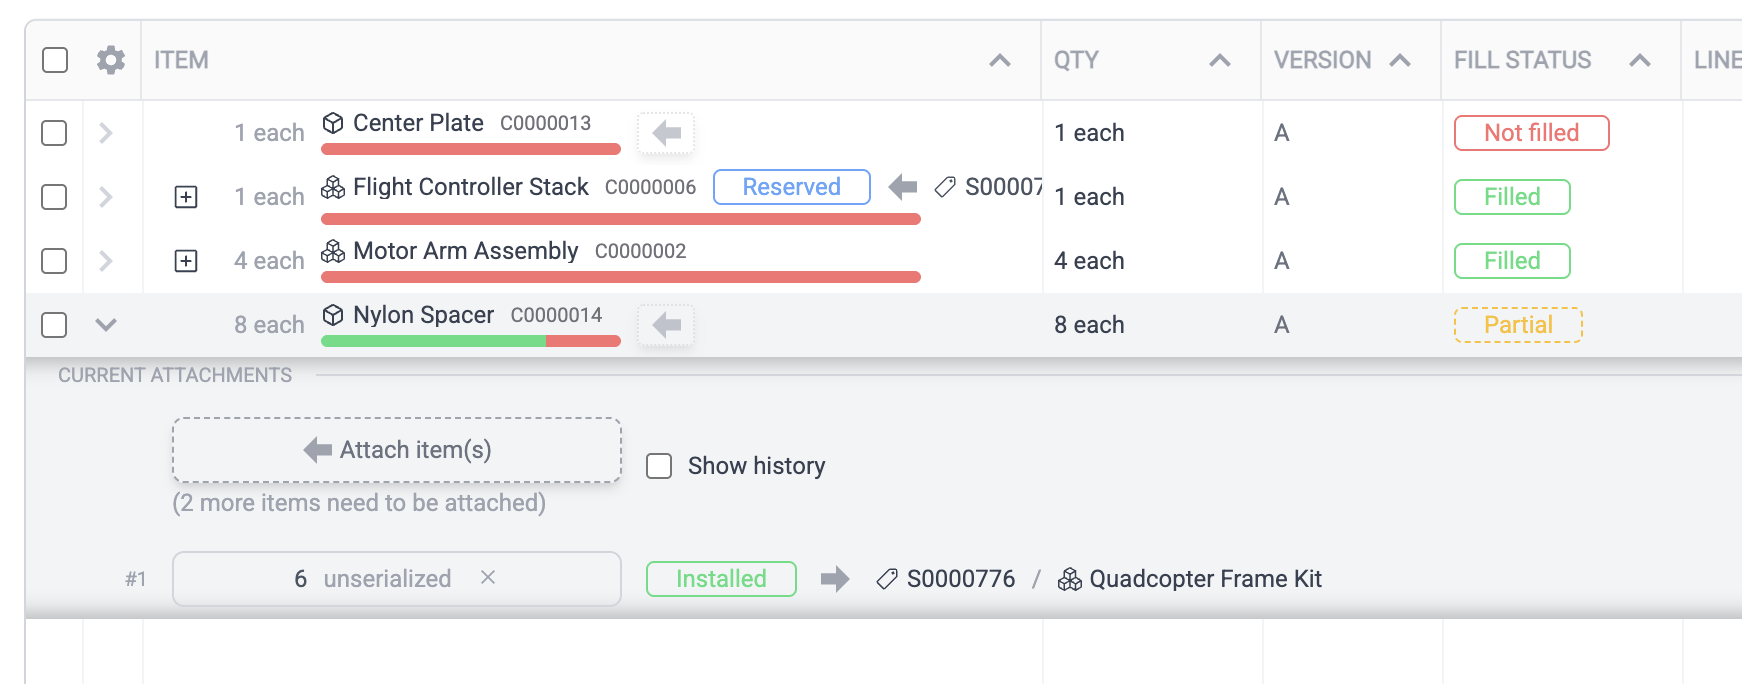
Now when the event detail is expanded we see the 6 unserialized installed. If we were to add more inventory we could finish this the rest of the way for this and the other line items until all the bar graphs were green.
Inventory analysis
However, we'll take a different route. Instead, we'll use Inventory Analysis to find the remaining gaps in inventory relative to this item and create purchase requests for them.
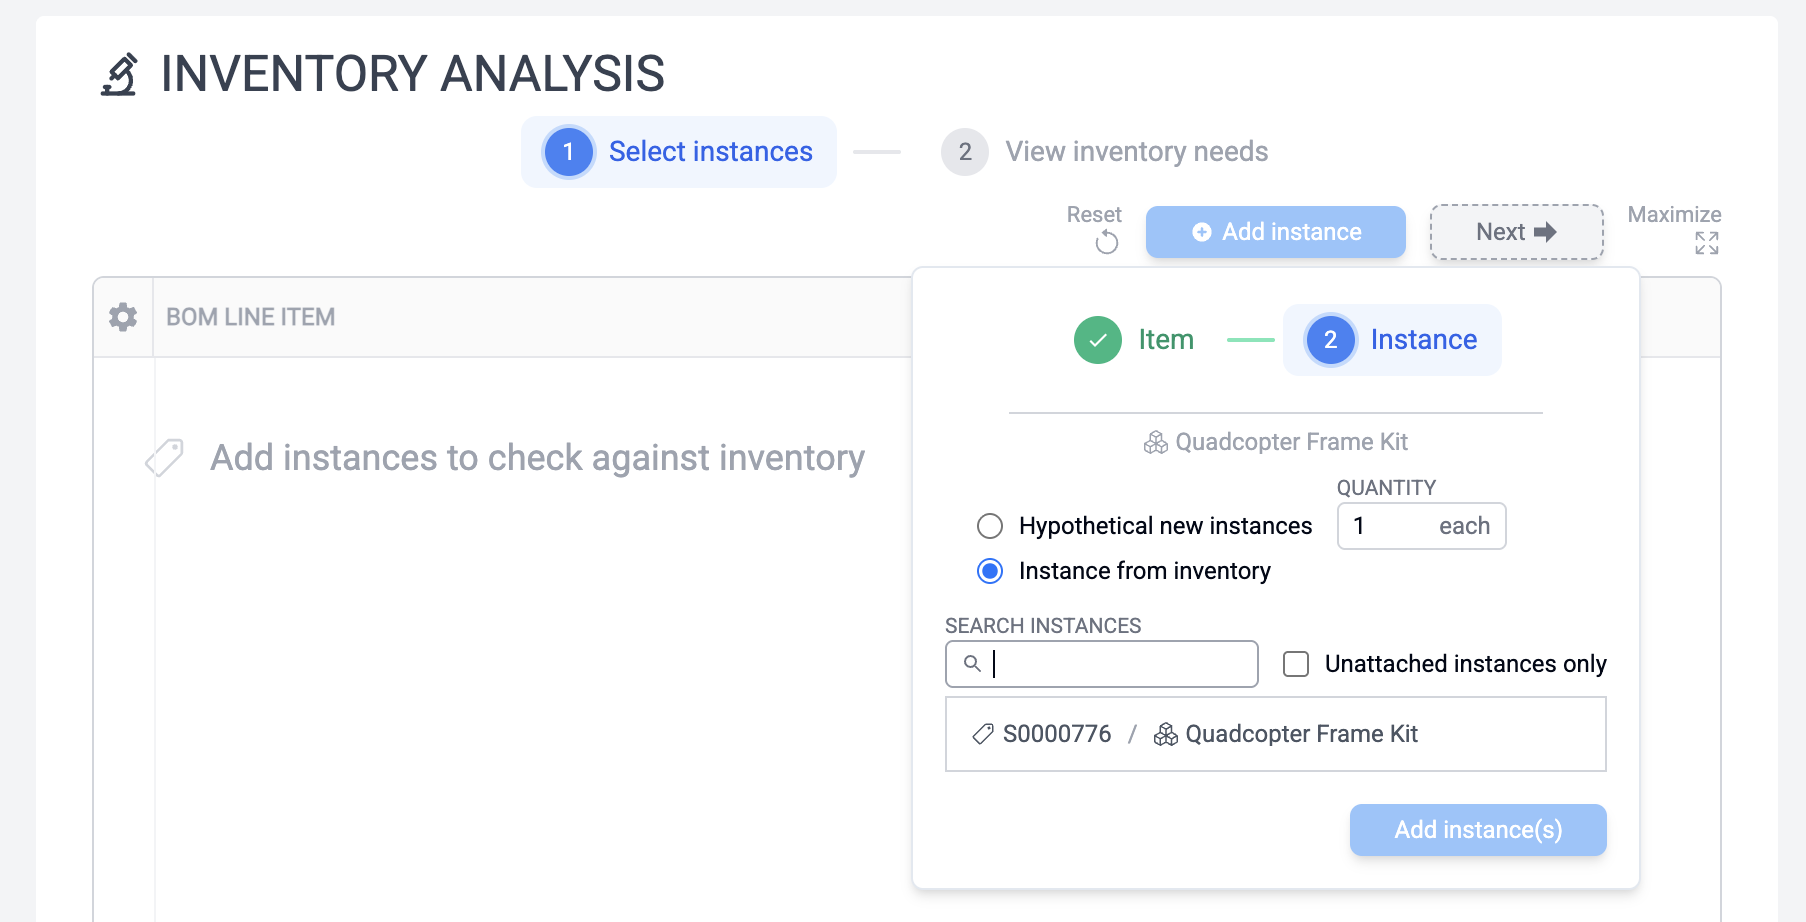
Close the instance editor, then click the Analysis tab at the top ribbon. Click Add Instance, pick Quadcopter Frame Kit, then choose Instance from inventory and select our instance we created earlier.
Tip
We see here in this instance search list its top-level completion graph, just like we saw for its individual line items. Indeed you'll also see this same top-level list in the inventory view in the item editor for serialized instances of Quadcopter Frame Kit. This gives a quick top-level view of completion status for any BOM instance.
Once the instance is added, click the "(2) View inventory needs" tab button (alternatively, the Next button) to view the list of items required from each vendor in order to complete this item. Looks like ten items from six vendors are needed. The software knows about these vendors because they were added to the item definitions in the spreadsheet. An item can be found at multiple vendors with multiple prices (qty 500, qty 1, etc), which can be selected with the dropdown menus where multiple choices exist.
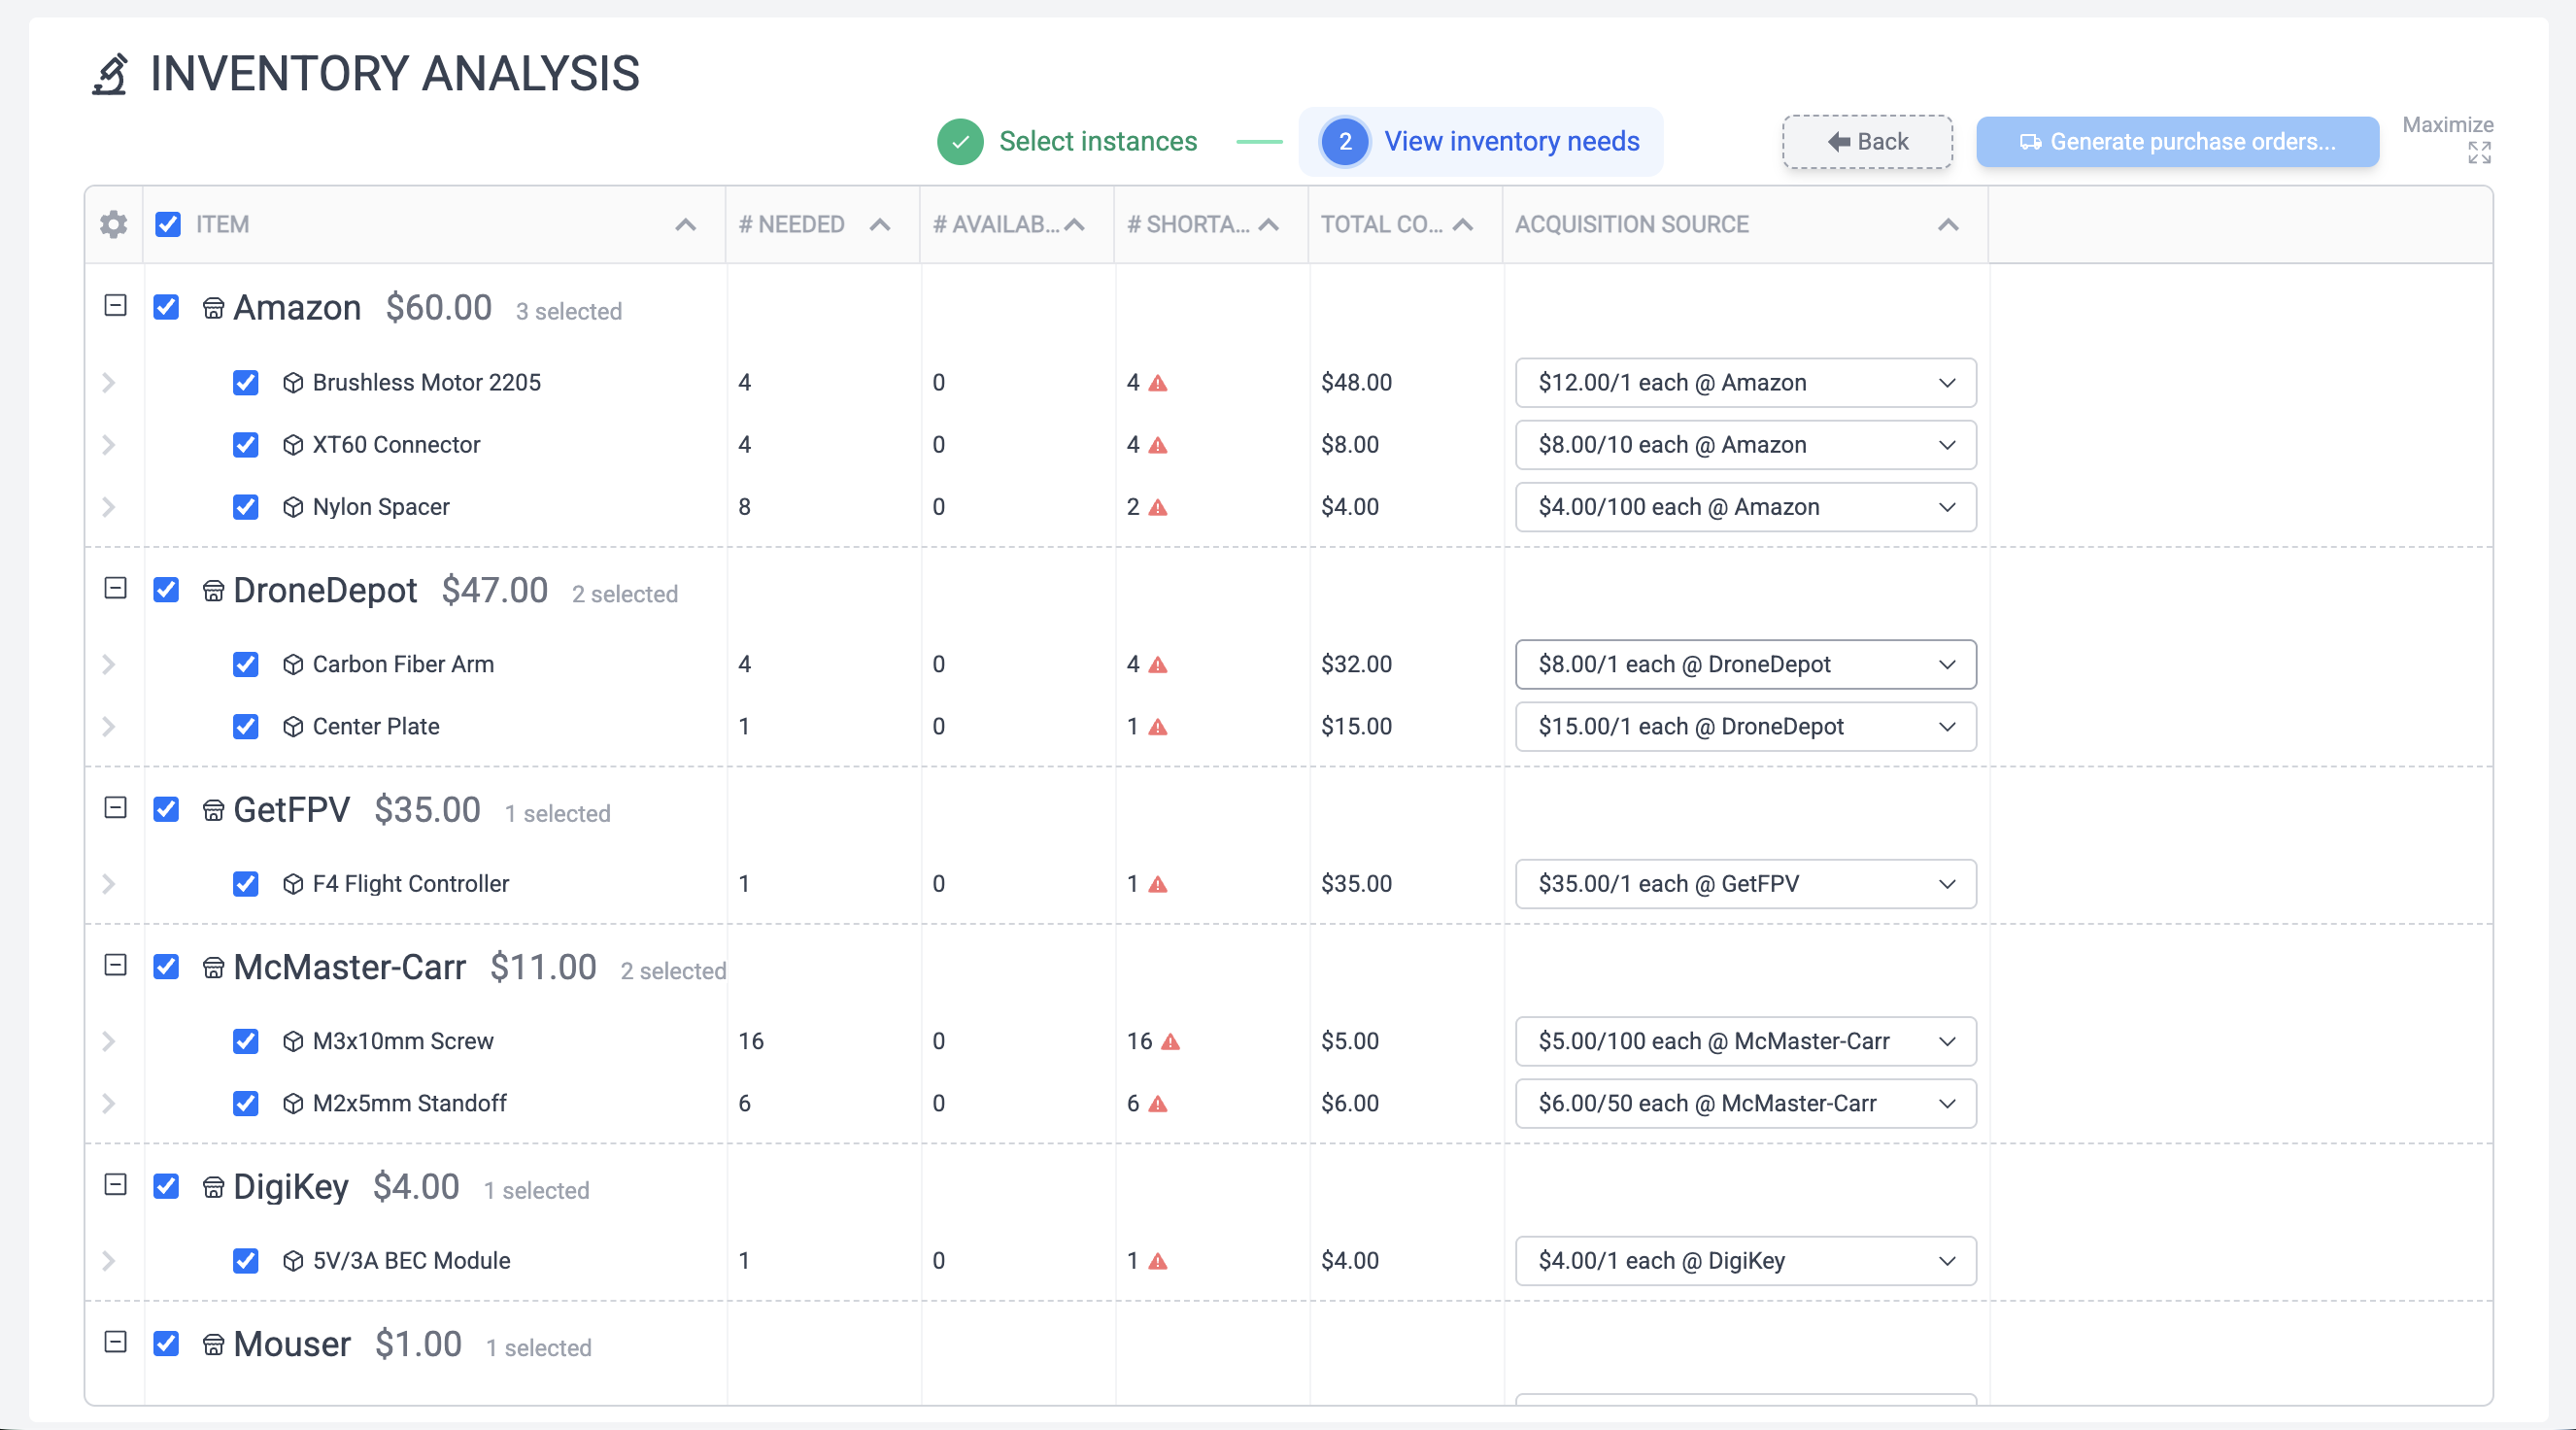
Note this doesn't just look at the items needed by the Quadcopter Frame Kit item/BOM, it looks at the items needed by this specific instance of the BOM, which in our case already has 6 Nylon Spacers, so we only need to buy 2 more from Amazon to fulfill the 8 each quantity requirement. However they come in a 100-pack, so it just recommended the 100-pack all the same.
We can select or deselect vendors, but in our case we'll create all six purchase orders by clicking the Generate purchase orders button. This will take us to the Purchases tab once complete.
Purchases
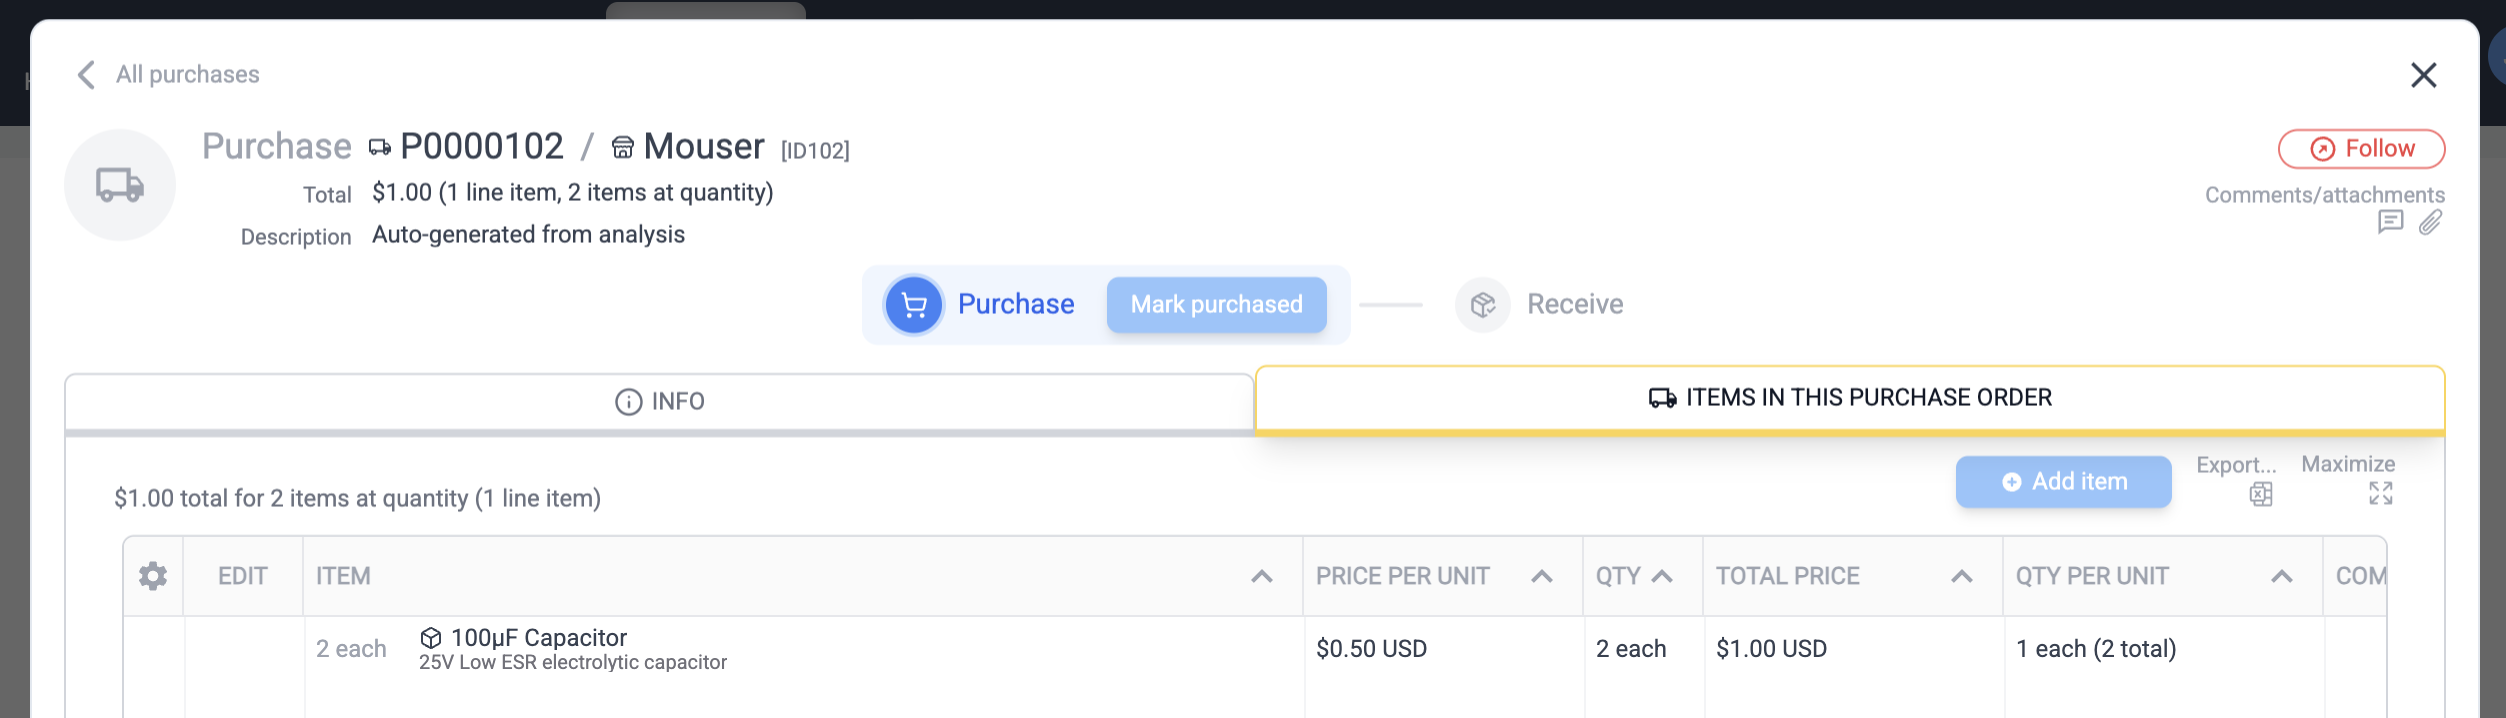
Click on the purchase number for the Mouser purchase, bringing up the purchase editor. Note the buttons at the top like "Mark Purchased". Purchases exist in different states. If a purchase approver is configured in the Info tab, then there are additional states.
Without an approver, you have three states:
- Created
- Purchased
- Received
With an approver, you have five states:
- Created
- Submitted
- Approved
- Purchased
- Received
Let's assume you just made the purchase on Amazon (optionally using this PO itself by exporting to PDF), so you'll now update the system by saying "Mark Purchased". Then, a few days later when you receive the package, you'll click "Mark received" followed by the "Yes, add to inventory" button to update inventory. Repeat this process for the next five purchases to simulate making these orders and receiving them.
Building the instance
Now let's return to the Items tab and select the Quadcopter Frame Kit again. You may find it useful to select the "Items with BOMs" and "Top-level BOMs" checkboxes near the item search. Note in the inventory list, the bar is now amber, denoting availability of all inventory.
We can move down the line on these line items clicking the grayed out arrow button next to the item and clicking it a second time to "Attach" at nominal quantity. It removes the quantity from e.g. unserialized inventory as it attaches. If you expand the event detail you can view details of the new attachments (or detach them, etc).
Recall the child instances were created at the first New Instance button step with "reserve" status. If you click on this reserve badge, you can swap it to install status with one click, representing the physical installation of that instance within its parent. Alternatively, you can open event detail, detach the reservation, and re-attach the instance as "installed" (or click the reserve button in the event detail to do the same, upgrade reserve to install).
Some BOMs may have many line items, which could make it tedious to have to do this for each one. In this case the checkboxes along the left column can be used to multi-select line items and attach all en masse with the Attach Selected button.
Deliverables
We may want to associate this instance with a Deliverable, i.e. a customer order. Let's say the order is for two instances of Quadcopter Frame Kit, which we will be selling to them for $3000 each. We'll then go to the Deliverables tab, create a new deliverable (call it maybe Customer A), and click on the "Items in this deliverable" tab. Click Add Item, select the Quadcopter Frame Kit, set the $3000 price, and set quantity to two. We now need to associate the instances that we want to ship to them.
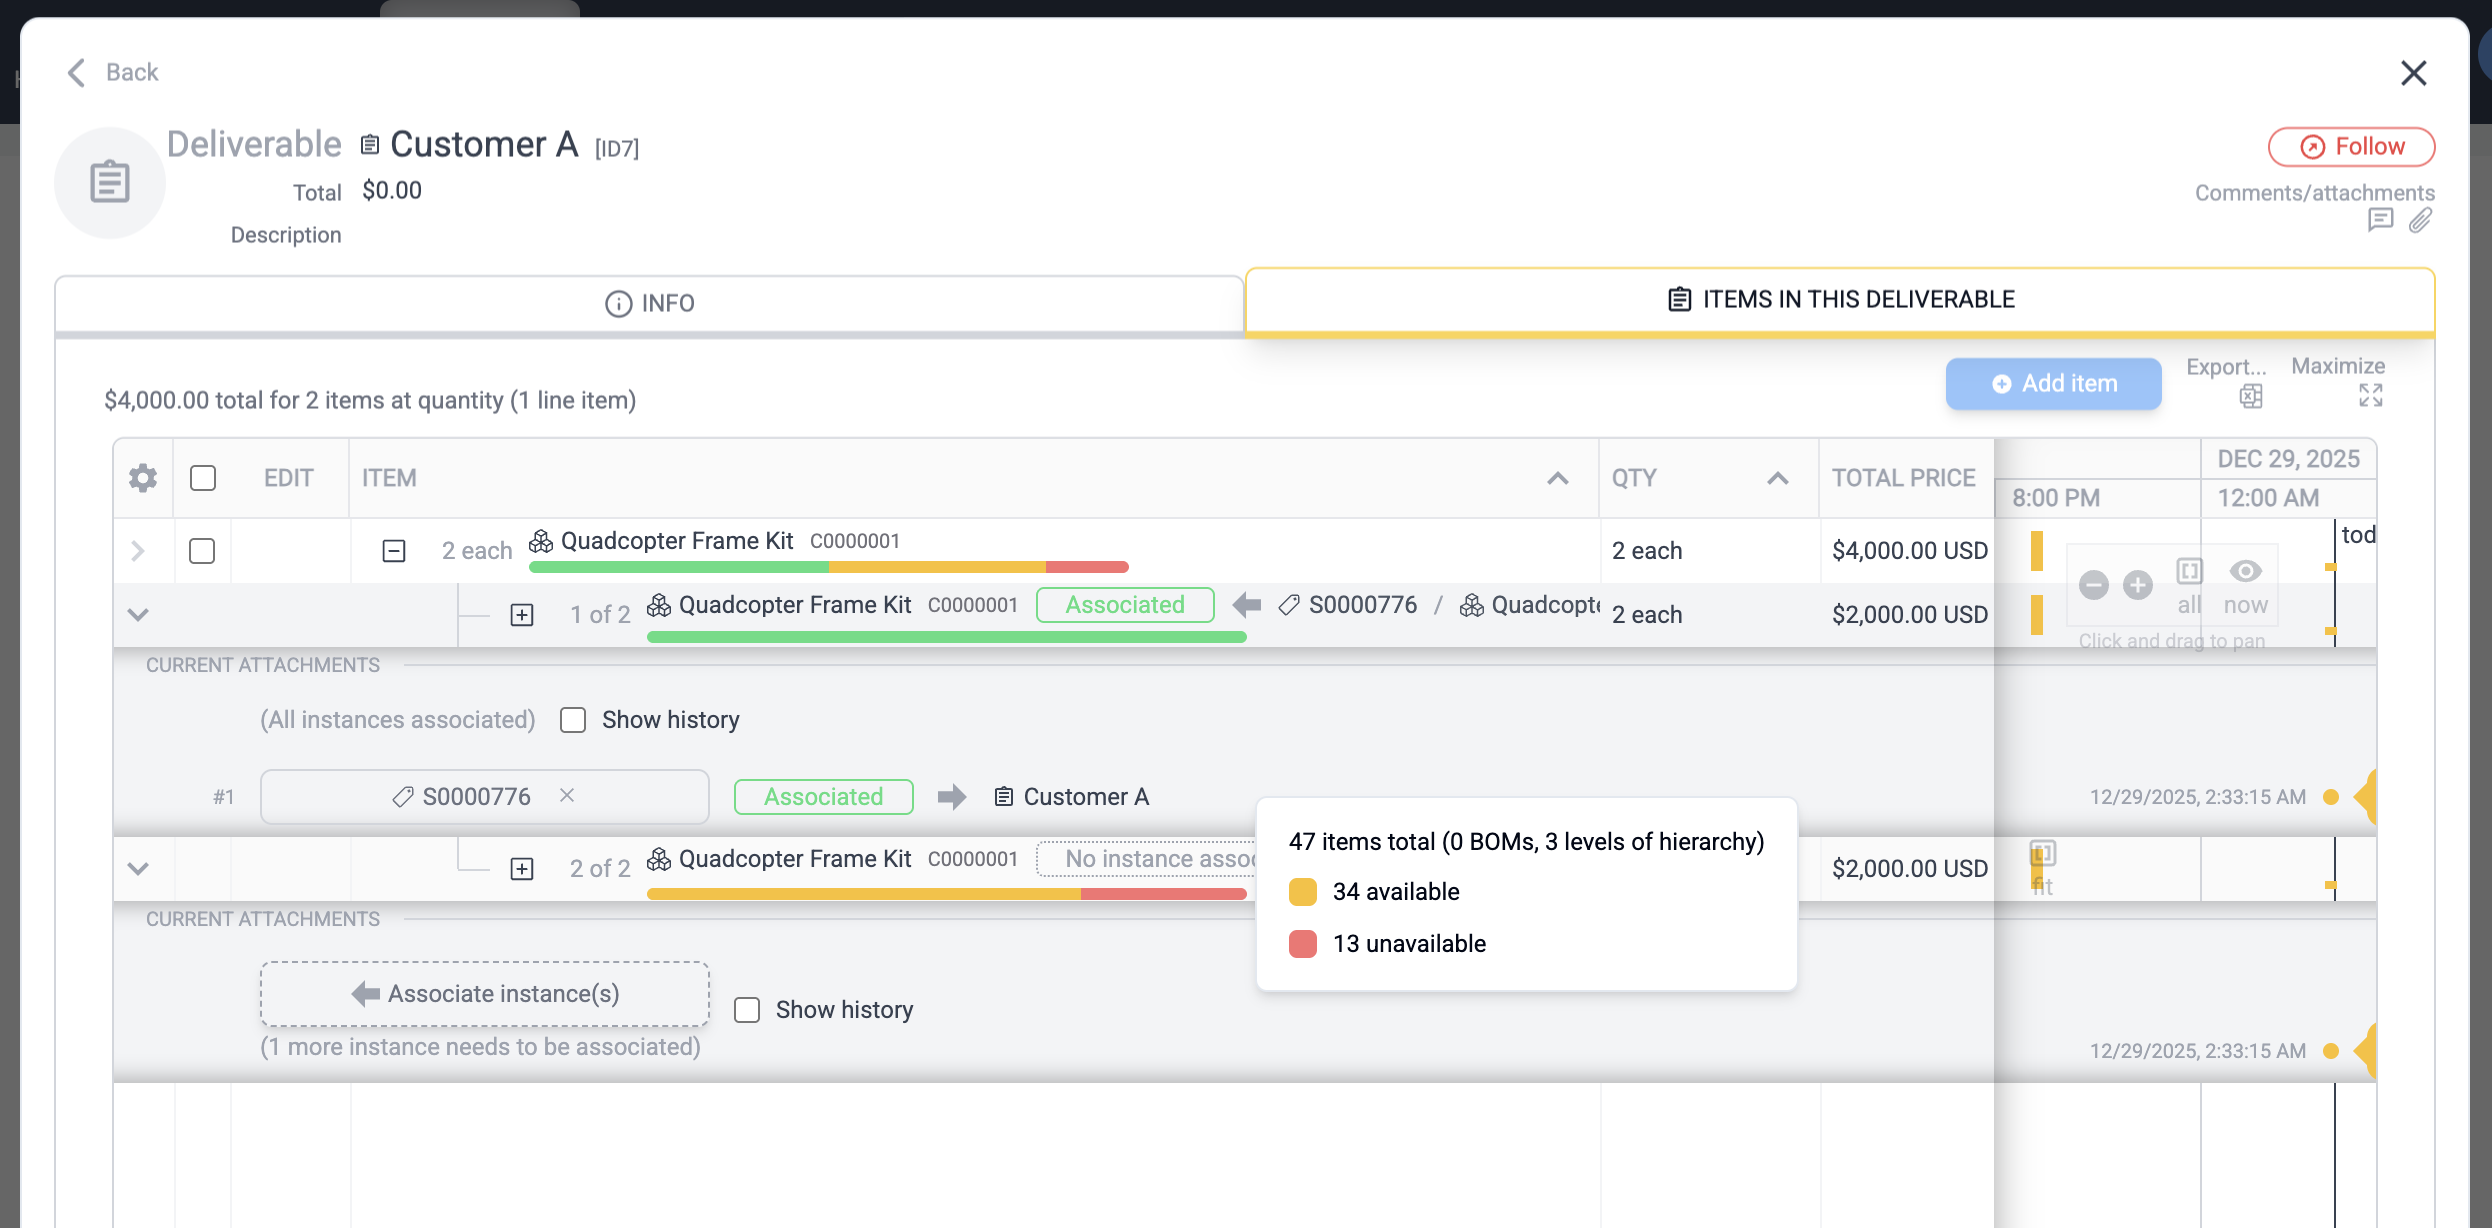
The first instance is the one we just finished populating. Expand the hierarchy plus sign to reveal the two instances, then click the their rows to expose the "Associate instance" button. Click that button, then instead of the default Create New tab, select From Inventory and select the instance we created. We have not yet created the second instance. Click on the Associate instance button, then select the Create New tab and create a new instance to associate with the Deliverable. This instance can then be
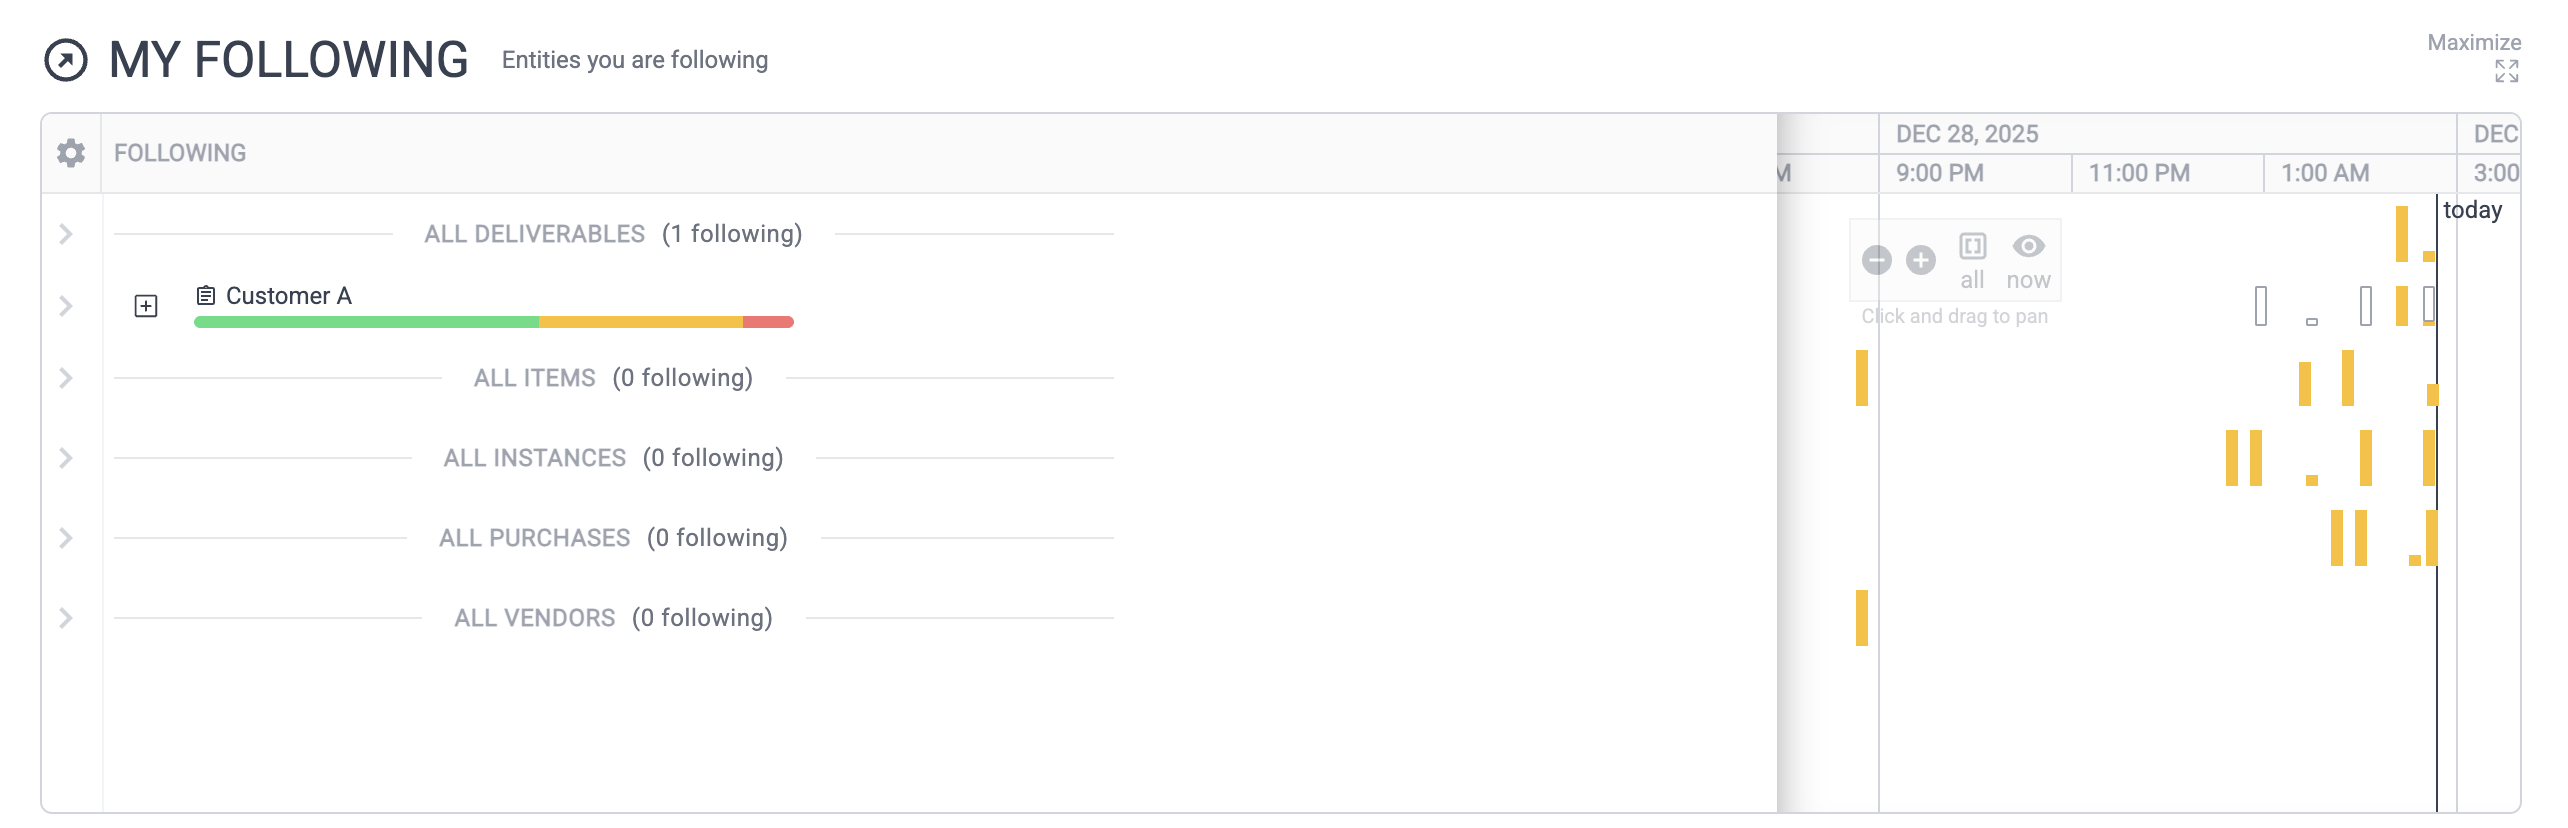
This deliverable then represents a high-level view of the completion status of all items within it. When viewed in the Deliverables list, it collects all events pertaining to the instances associated with it, serving as a high-level view of both completion status and activity. You may thus want to view this on your home page for a time by Following the item. Click the Follow button at the top-right of the Deliverable editor, then click the main Home page to see it show up in My Following.
Tip
The white bars in the Gantt histogram denote descendants' events in the case of BOM instances. Amber bars denote direct events on that line item, white outline bars represent the existence of a child subassembly's events